Showing posts with label #craftingwithlisahorton. Show all posts

Thursday, 18 June 2020

MANDALA CARD


    Welcome to my blogpost for Lisa Horton Crafts

This time I made a card with the lovely mandala Stencil. Enjoy this tutorial, and at the end of the tutorial I have a video link where you can see it in speed on You Tube how I made this card.


At first I made two of the same cards with the mandala stencil. I used the following distress ink's: Picked raspberry and worn lipstick. I used a blending tool to apply the ink.


So now I have two of almost the same cards.


In the next step I divide one of the cards in 2cm peices.


I take the strips alternately, and place them on the card on the same spot as the background stencil so it matches. And stick them on with foam tape or you coud also use 3d glue.


After that I splattered some dylusions ink over the card and I cut out a bold word from the new bold wordage stamps (aren't they wonderful).


This is what it looks like up close.


And I weaved through a peice of net curtains that I had as a leftover , and I made a little bow with it.

And voila here is the finished card.


I have also a video tutorial below here, so you can see how I made this card.


And below here I have the same card in a different colour.


Thank you for visiting my blogpost. I hope you enjoyed my tutorial.
watch for more inspiration on  Crafting with Lisa Horton. There are a lot of projects over there from me and my other lovely DT members.
A comment on what you think of my blogpost would be kind, but it's not required.

All products can be bought at That Craft Place Ltd


I wish you a lovely day and if you decide to make something similar feel free to share the photo's of your project on the facebook group or instagram and tag me @bobomadeby


Wednesday, 17 June 2020

Versatility of Mandala stamps and stencils


Hello, and welcome back to the Lisa Horton Craft blog, Claire Newcombe with you today.

Today I'm sharing with you my projects from each of my FB live events throughout the month of June so, plus the first look at a card scheduled for 23rd June.
Each of the projects in the photo above have been made with the June challenge theme in mind, and will be sent to the winner of June challenge which is 'SETS of THREE'

The theme can be interpreted in any way you choose, whether it be adding three elements on your project, or maybe making three ATC's, a set of three co-ordinating projects....your choice, have some fun with it.


There is another way in which all the projects made are linked, and that is that they all feature the fabulous Mandala collection of stamps and stencils....all of which are now available from Lisa's website

I wanted to create a selection of very different projects, demonstrating just how versatile the Mandala designs can be and how well they slot into Lisa's whole repertoire of products.

ALL FB LIVES FROM DESIGN MEMBERS CAN BE FOUND ON OUR NEW YOUTUBE CHANNEL, FOLLOW THE LINK TO SUBSCRIBE

I have attached the Youtube links for the projects that I have already created, if you would like to make them yourself.

1. Facebook Live 2nd June (YouTube https://www.youtube.com/watch?v=QeED11ESUOo)
I have created a set of three ATC's (artist trading cards) in a very feminine style. The mandala stencils feature in the background as a beautiful backdrop for the A5 Foliage stamps.
You will see on the middle card the mandala pattern has been clear embossed as a design feature. 


----------------------------

2. Facebook live 9th June (YouTube https://www.youtube.com/watch?v=qBKU7Y0AhGE&t=498s)
These cards show the beauty of the Mandala stamps themselves, and the fun you can have colouring them.
But also how they can be used to create subtle backgrounds, when stamped with clear embossing ink onto coloured card for a tone on tone effect.


------------------------------

3. Facebook live 16th June (YouTube https://youtu.be/2XeqCWhlb2Q)
The mandala stencils are layered here in the background with Lisa Hortons Woodgrain background stamp, and Mandala stamps highlighted with mica powder.
It is important to show that all products released into the Lisa Horton range will be able to mix and match with each other.


----------------------

4. Facebook live scheduled for 23rd June
This project uses the mandala stencils in a more familiar way, layered up to show their beauty. I have used the circle stencils with. distress ink to create a background. The  'grungy' details have been added using Lisa's A6 Texture stamps.
I hope you can join me next week when i demo this on a FB live 


Thank you so much for stopping by, I hope this has made you smile today.
Remember we have a lovely Facebook group where we'd love for you to share all your makes with Lisa products, I'll pop the link just here


Take care of yourselves x

Thursday, 11 June 2020

Christmas In June

Lisa Horton Crafts - Christmas in June

Hi everyone, Jane here!

We’ve almost reached that time again, and I know Lisa and the design team are so excited for her next live shows on Create and Craft.
The live shows can be found online here, or watch on the following:-
Sky channel 683
Freeview channel 95
Virgin channel 748
Freesat channel 813
Apple Tv
Amazon Fire
I tend to watch online on my tablet while crafting 😉

The Christmas shows have already started and tomorrow it’s our Lisa’s turn, and she will be bringing you a huge range of seasonal goodies to get you into the Christmas mood.

We have MDF advent calendars, paper pads, stamps, more mermaid tails and sooooo much more, so be sure to tune in at either 7:30 am or 11:15 am or even better, catch both shows for demos and ideas.
The full range from Lisa Horton Crafts can be found here.
Don’t worry, if you miss both shows, they can be watched online on catch up. Also keep an eye on our group where links to the catch up shows will be posted.
Lisa will have some amazing demonstrations lined up, and I think I speak for the entire design team when I say, we’re all buzzing with excitement.
Two weeks after the live shows on Create and Craft, you will be able to go shopping here if you prefer.

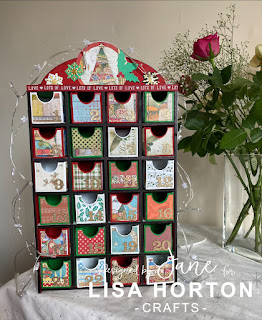
I had so much fun building and decorating my advent calendar. I used traditional colours and the Make A Wish Christmas papers from Stamperia.

You can find more ideas for Christmas from the DT on our Pinterest board here

If you’re looking for some tips on how to use your LHC stash, you can find it all over our social media channels, all of these are listed below:-
And you can always follow all the design team on Instagram by searching #lisahortoncraftsdt where you will find all of our fabulous projects.
Take care and lots of love
Jane xoxo

Monday, 8 June 2020

Summer Showstopper


Hello again.  
Elisabeth here with a bright, beautiful showstopper of a card!  

To make a Mandala Tuxedo Card

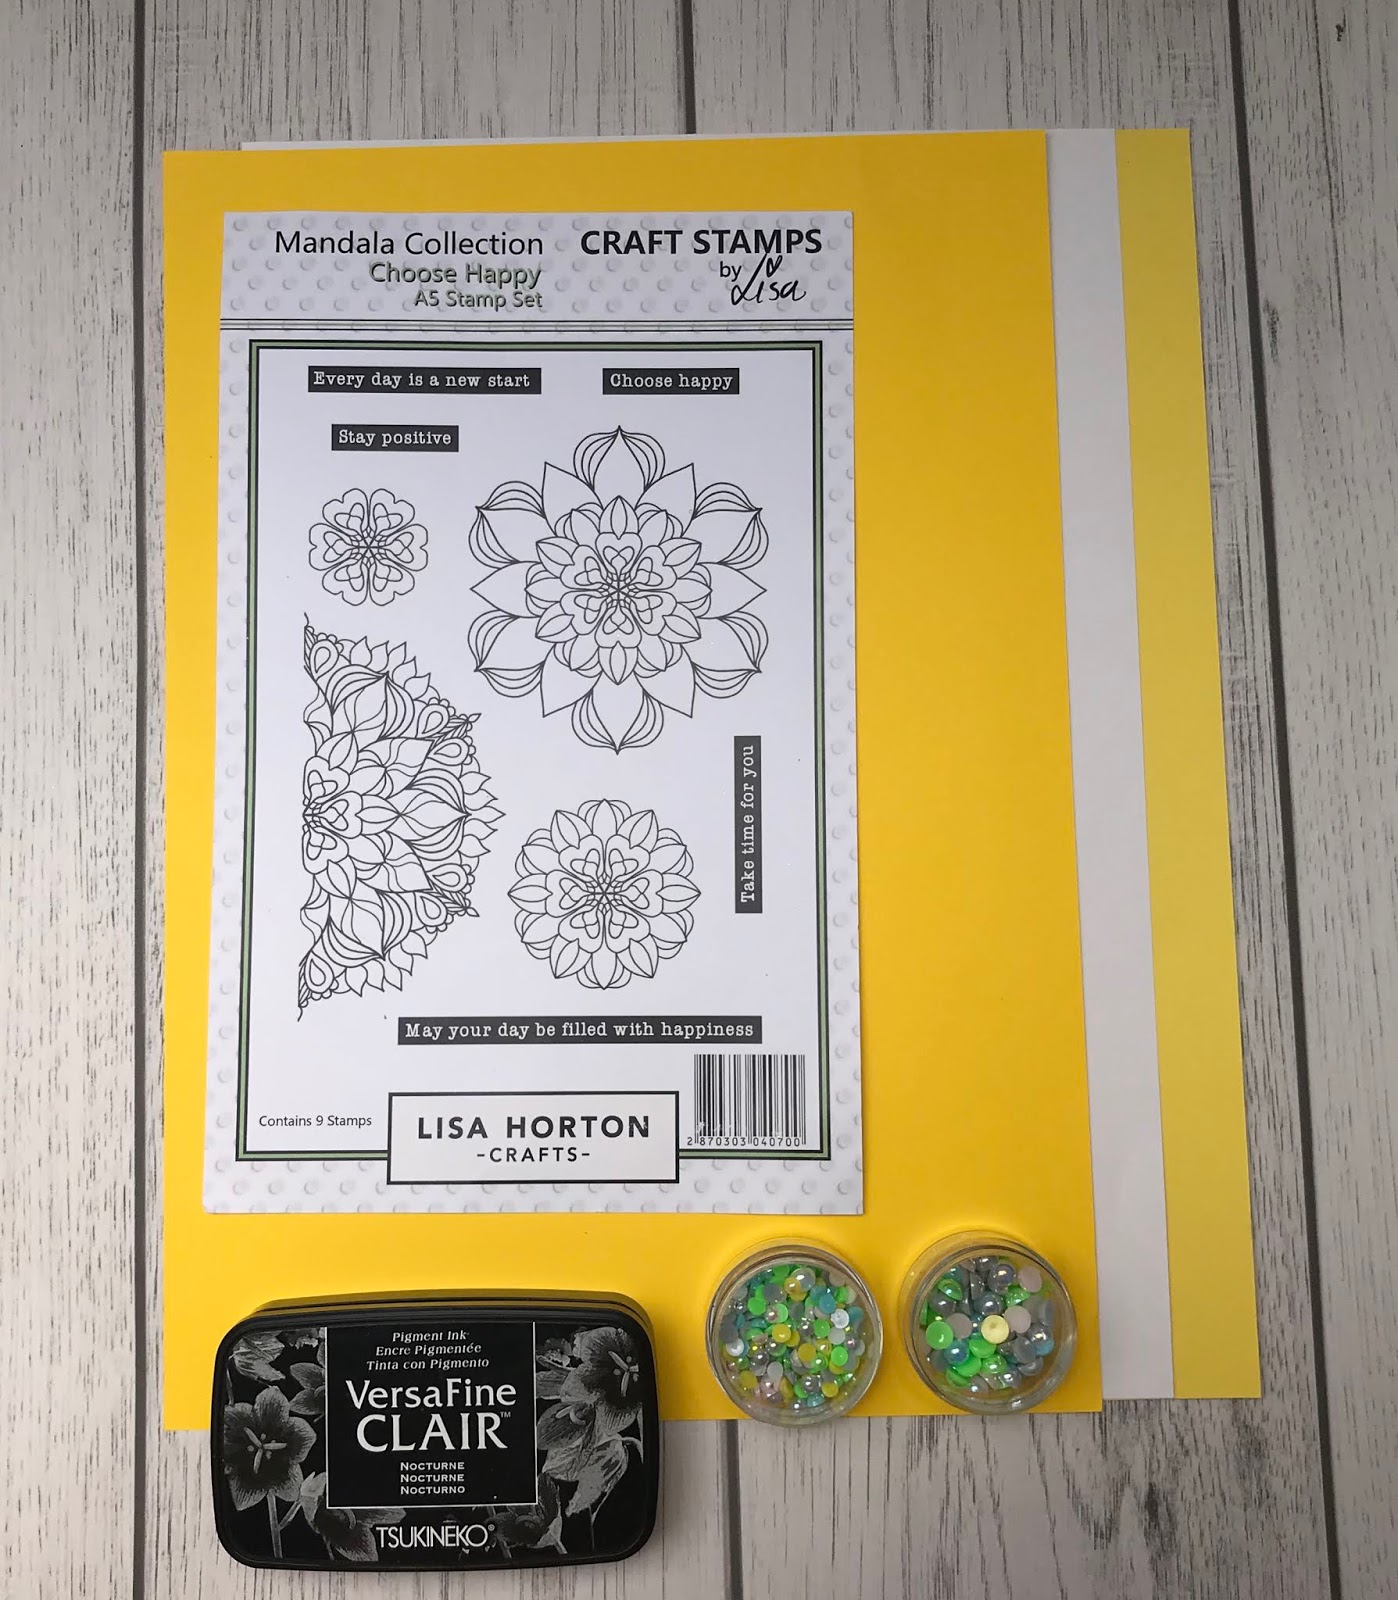
You will need:

Lisa Horton Crafts - Choose Happy Mandala Stamp set
Lisa Horton Crafts - pearl embellishments
Lisa Horton Crafts - Natural Sisal
I sheet of White cardstock - approx 160gsm
2 sheets of colour cardstock - I used two shades of yellow
Black waterproof ink - I used Versafine Clair (Nocturne)
Red liner tape.
Wet glue
Sticky pads


How to create this Summer Showstopper Tuxedo card:

1.  Use the template below to create the tuxedo base card.  If you need detailed instructions then take a look at my blog post from last year,


2.  Stamp out nine medium sized mandalas and nine smaller sized mandalas.  In this version I matched a bold yellow, medium sized mandala with a light yellow, small sized mandala - and vice versa.  Stamp out your chosen sentiments too.


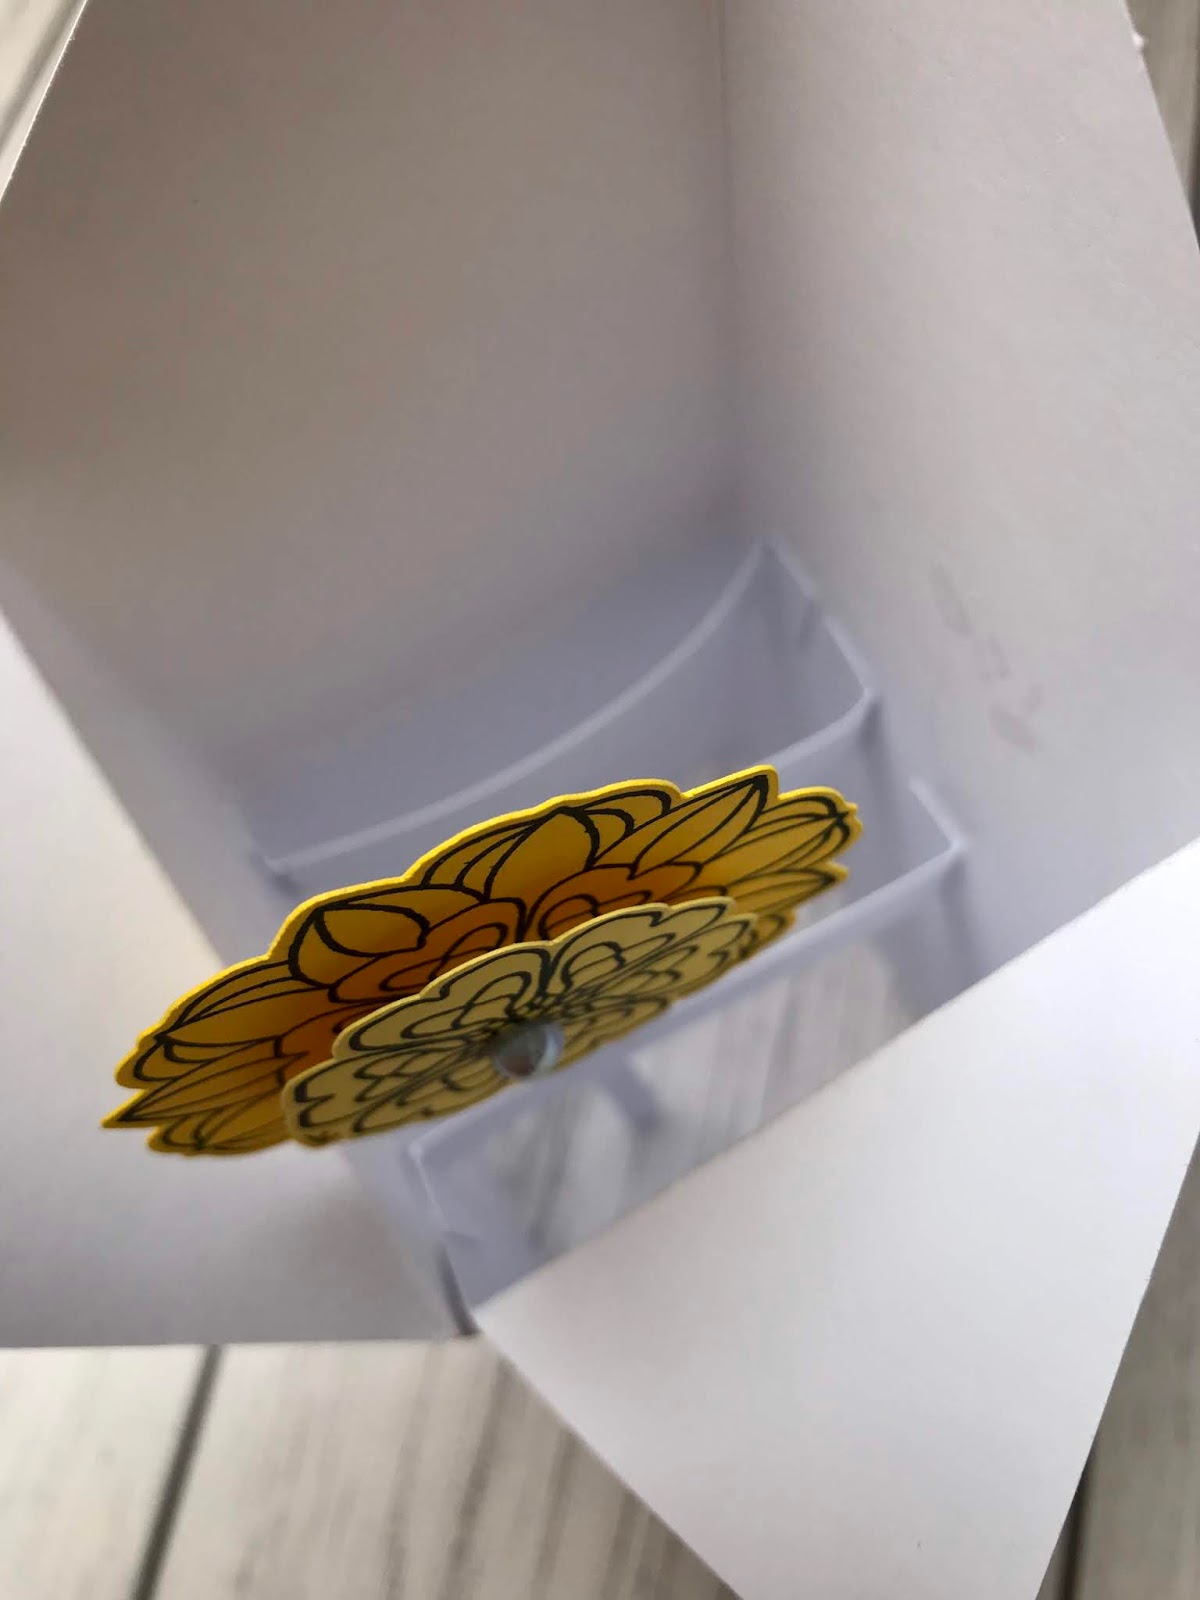
3.  Once cut out, adhere a small sticky pad to the centre of every medium sized mandala and layer  the smaller mandala on top.


4.  Embellish each mandala flower with a pearl from Lisa Horton Crafts ever expanding range of colours.  I used a subtle silver pearl to the centre of my mandala flowers.


 5.  Cut several wafer thin strips of card (from the waste of your tuxedo template) and begin sticking the mandala flowers to one end.  You want the flower to feel sturdy so place the strip centrally behind the flower.


6.  Cut 3 strips of white card 1 cm in width and 9cm in length.  Score each strip at 1cm and 8cm along the length.  Fold one end back and the other forward.  These three strips will act as the struts within your tuxedo card.  Glue the tabs to the inside of your box as shown below.


7.  Normally I would decorate the outside of the Tuxedo card before making it into a box and adding the struts.  However, I did not know how I wanted the card to look until I saw the flowers in situ.  Using the spare paper from the stamped images.  Cut the panels for your card as shown.  Then decorate the front panels with the smaller mandala stamp.  The back panels are kept plain - so that a message can be written.  Glue all six panels to the outside of your Tuxedo box.


8.  Attach the flowers from the front strut, building up the height as you go.  I also added Sisal in between the rows to help the struts stay in place.  The Sisal has the added bonus of finishing off the card with a hint of wispiness.  Finally add your chosen sentiments.  

Your Summer Showstopper of a card will lie flat for posting and will pop back up again when the recipient takes it out of the envelope.


I do hope you will enjoy making your own Summer Showstopper card.  Please do share your makes with me on our Facebook Group Page - Crafting with Lisa Horton.


You can also find further inspiration for the whole range of Mandala products on our dedicated Pinterest board


As always, if you have any questions then please comment below and I will be more than happy to help you.

Keep crafting - stay safe and keep well  xx


Monday, 1 June 2020

Distressed Postcards


Hi everyone, welcome back to my blog post. 
Today I'm going to be using Lisa's postcard background stamp as the main focus of a pretty card which would 
be suitable for so many occasions.
You will need: 
Lisa Horton sisal
Lisa Horton Luxury Pearls - Rainbow Collection Cool Skies
Stamperia Roses and Laces paper
Distress Oxide inks (or your preference)
Paperclip and lace (optional)
Start by stamping the postcard twice onto some cream card. Holding the stamped image, tear the card edges 
towards you to reveal the core of the card on all sides. Next, use your inks to colour those edges - front and back 
as you will be curling the edges up.  Use Distress Oxides (old paper and just a touch of vintage photo) to give a
vintage feel to your project. I decided to make the postcard underneath darker with a touch of salty ocean 
Distress Ink. Curl the bottom right corners by rolling them around a pencil.
Next I used a portion of 1 sheet of Stamperia Roses and Laces paper pack. I tore the edges and inked them 
the same as the postcards. 

Mount the backing paper onto a cream card and tape the postcards on top. I added a heart shaped paperclip
(from my stash) too.
Stamp your trailing foliage and colour the leaves with ink. Use a brown pencil/pen to darken the stems and then 
cut out your images. (I stamped 2 of the smaller sections).  Slightly curl the edges of the leaves to add a more 
realistic look and then use 3d foam to attach to the edge of the postcard. Remember to only glue the leaves at 
the top if your flowers are going to sit in that area.

Take a little sisal and attach with glue in the area that your flowers will sit. Die cut your flowers - I usually cut 3 for 
each one to add dimension. Layer them up with 3d foam. I used Lisa's newest collection of hombre pearls to give 
a beautiful finishing touch to the daisies, and added a little paper lace from my stash too.

Hope you've enjoyed making this project with me. Feel free to comment on my post should you wish to do so.

Stay safe and happy crafting! 
Tina x


Friday, 29 May 2020

Sunshine Tag

Sunflower Tag by Jane Robinson


Hey there!
Welcome back to our blog.
I’m Jane, and have recently joined the Design Team for Lisa Horton, and I’m here today to hopefully inspire you to try this project or something similar. Give it a go, then post in our group, and perhaps tag me with your amazing creation.
This quick and easy project will have you exploring your creativity in no time. Most of the products I used are from Lisa Horton Crafts, and can be found here


I started off by looking in my stash for a tag like base. I came across
some oval shaped card. I suddenly remembered; I’d saved these after buying some new socks. I’d bought some of those little trainer socks from Primark, and the socks were displayed over them. I kept them thinking they would come in useful someday.
Well… someday arrived, and I quickly dug out my stencils, acrylic paints, and other crafty goodies.

First step:
I laid a base coat of white gesso, even though the tags were originally white, they had a shiny surface. I need any medium I use to adhere well, so gesso is definitely the way to go, as it provides a primed base which will take anything your crafty hands will throw at it.
I used my heat tool, on the number one setting to dry.

Step two:
I used Lisa’s ‘Pennies In A Line’ stencil and Decoart Marigold Acrylic paint to create the background. The paint was applied sparingly, using a make-up sponge.

Third step:
I mixed some of Lisa’s Sunshine Mica Pigment Powder with some gritty structure paste, and a drop of ink refill in a summery yellow colour. Then pushed that through LHC ‘Spring Bloom’ stencil.

Step four:
Make a brew while the structure paste dries :D

Step five:
I used a finger dauber to colour the centre of the blooms with a dark brown shade of ink, used the same colour to stamp the script using LHC ‘Textures’ stamp set, and also ink up the edges for a distress look.

Sixth step:
I cut apart one of the white sentiment strips from LHC ‘Wordage Sheets’, coloured it with the same acrylic paint, and adhered using 3D silicone glue.

I finished it off with a brown cord tie.

Thanks for taking a peek today, be kind to each other.
Jane xoxo


Monday, 25 May 2020

Rustic Round Storage Box


Hello and thank you for joining me for my first ever blog post.


Today I am going to show you how I made this gorgeous round Rustic Round Storage Box. 


You may have seen one I made for Lisa’s show back in April. Well I loved it so much I thought I would make another!


I started by using a black marker pen on the tabs as I found last time when I painted them that they can cause the tabs to expand a little so it just makes it easier when it comes to assemble at the end.


I then painted it all in black Gesso.


There are 8 sides to the box so I decided to use Lisa’s Wood Grain Stamp and also her CrackleStamp on these. I did 4 of each and embossed them with a brown embossing powder followed by some gilding wax to add to the texture.

I also embossed the top and bottom of the box with the Crackle Stamp… it looks so effective!
Next I took some substrates and gave them a thin coat of black gesso too.


I wanted to give the effect of mini doors and the Hinges and Locks work beautifully for this.
To get the rusty effect, I first used some Cosmic Shimmer Strata Paste. If you have never used this before, it gives a rough, gritty feel to it. 


I then used some Cosmic Shimmer paint in a Teal colour and sparingly coated some of the area where I had put the Strata Paste. 


Once dried, I then used some ArtDeco Transparent Yellow Iron Oxide and painted over some of the Teal paint.


Finally topped off with a coat of Quinacridone Gold and the rust effect starts to come together.   


I added some Brads to the Hinges and a drop of Alcohol ink to tone down the colour as they looked a bit bright. It gives such a gorgeous effect!

For the other 4 sides I wanted to add Some of Lisa’s Wings and Cogs, I followed the steps above for the Cogs too.


For one set of wings I used some glue to stick down some micro beads, these are great to add texture to projects.


For the other set of wings I used some Cosmic Shimmer Lava Paste. This is great stuff!! I used a thin layer and heated it to get the bubbly effect.


Once done I made a thin mix of White Spirit and Brown oil based paint to paint them. The Lava Paste soaked up the mix wonderfully and gives a great look.


I had some Skeleton leaves in my stash, I distressed them a touch with Ground Espresso distress ink. They are very delicate so you need to be very gentle with them. I placed these behind the Wings with some of Lisa’s Pink Sisal which I sprayed with brown Distress ink first and added the cogs. 


I do love my Gilding Waxes so generally go over it here and there until I feel I have the look I am after. I also added a few little keys from my stash too.


Once done, I was able to assemble the box together and I added a little metal knob on top.


I just loved doing this project!! I hope you have enjoyed this blog and I hope I have given you some inspiration to make your own Round Storage Box... 


Thank you for stopping by. 


Much Love Nicky xx