Showing posts with label MDF. Show all posts

Thursday, 11 June 2020

Christmas In June

Lisa Horton Crafts - Christmas in June

Hi everyone, Jane here!

We’ve almost reached that time again, and I know Lisa and the design team are so excited for her next live shows on Create and Craft.
The live shows can be found online here, or watch on the following:-
Sky channel 683
Freeview channel 95
Virgin channel 748
Freesat channel 813
Apple Tv
Amazon Fire
I tend to watch online on my tablet while crafting 😉

The Christmas shows have already started and tomorrow it’s our Lisa’s turn, and she will be bringing you a huge range of seasonal goodies to get you into the Christmas mood.

We have MDF advent calendars, paper pads, stamps, more mermaid tails and sooooo much more, so be sure to tune in at either 7:30 am or 11:15 am or even better, catch both shows for demos and ideas.
The full range from Lisa Horton Crafts can be found here.
Don’t worry, if you miss both shows, they can be watched online on catch up. Also keep an eye on our group where links to the catch up shows will be posted.
Lisa will have some amazing demonstrations lined up, and I think I speak for the entire design team when I say, we’re all buzzing with excitement.
Two weeks after the live shows on Create and Craft, you will be able to go shopping here if you prefer.

I had so much fun building and decorating my advent calendar. I used traditional colours and the Make A Wish Christmas papers from Stamperia.
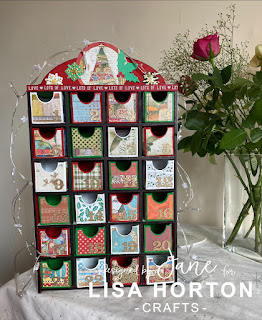
You can find more ideas for Christmas from the DT on our Pinterest board here

If you’re looking for some tips on how to use your LHC stash, you can find it all over our social media channels, all of these are listed below:-
And you can always follow all the design team on Instagram by searching #lisahortoncraftsdt where you will find all of our fabulous projects.
Take care and lots of love
Jane xoxo

Thursday, 23 April 2020

MDF Tag Canvas


Hello everyone.

Sharing a canvas made with MDF tags and a background using beautiful stamps and stencils.


For the canvas I used

Lisa Horton crafts MDF tags and panel,
Majestic and Jewelled butterflies stamps,
Trailing foliage Ivy stamp set,
Daisy Burst stamp,
Nested banners dies,
Bubble wrap, Script stencils,
Mica powders,
Sisal,
Gold embossing powder,
White card,
White Gesso paint,
Inks and glue gun.


I used the panel at the back of tags with hot glue gun.


 Added white gesso paint to the edges of tags as you can see on the photo.


I blended dye inks with stencils randomly to the white card, used purple and green colour inks.


I drawn around the canvas with pencil on the back of blended card, also I marked little dots where the little holes of the tags are. 


Cut around the card then I draw lines of the edge around 0,4 cm to make slightly smaller then the canvas itself.


I used my punch holes and punched holes from the back of the card where I marked little dots.


As you can see the photo above, the card shape is slightly smaller the the canvas.


I did added some splatter by mixing some ink with water on acetate and adding to the card. Used distress tool for the edges and tore some edges little bit and blended some ink around the edges.


I stamped some daisies and ivy with inks, some daisies I stamped with Versa mark sticky ink and added pink mica powder to the stamped flowers. Then glued the patterned card with tacky glue to mdf tag canvas.


Stamped the butterflies and Ivy coloured them with distress inks using a bit of water. Fussy cut out the butterflies and ivy. I mixed little bit of pink mica powder with water and coloured the butterflies on top of red colour. Stamped the sentiment with Versa mark sticky ink and heat embossed with gold embossing powder. I layered some ivy and butterflies into canvas before gluing them as you can see the photo above.

Please come and join Crafting with Lisa Horton Facebook group 

Thank you for stopping by and leaving your comments.
Stay safe.
Crafty Hugs Natalia.

Friday, 13 March 2020

How to make a MDF book - romantic hard cover journal

Hey everyone!
I wanted to share with you my latest MDF book.
I don't usually make romantic, pastel projects but this one just kind of happened.


Let's start by making the book...


Glue the book covers and spine on your chosen paper - it's vital that you leave 0.5 cm in between the covers and the spine.


Trim any spare paper around the edges but make sure you leave at least 0.5 cm for wrapping over.


Cut out the corners as above to allow for neat wrapping.


Now, it's time to start wrapping over the paper. 
Make sure you're using a strong double-sided tape for this!
Start from the short edges.


Then the long edge.


Now your outside cover is ready.


For the inside cover, you need to cut a rectangular piece of paper and simply glue it in place.
Make the rectangle minimally smaller than the cover itself.


Delicately fold the cover to create the crease between the covers and the spine.


You're ready to start decorating!


Using Retro Petals stencil and two colour-coordinating inks, add a design creating background for the embellishment cluster.


Build up layers using lace, paper embellishments and flowers.


Keep adding until you're happy.


I decided to make a matching journal insert for the book.


With the same colours as the cover, I added the stencil design.


Then built up the embellishment cluster.


Time to add the insert to the book.


Make a loop from a lace - make sure it's big enough to fit the cover through it.


Making sure you don't damage it, slide the cover and the journal through the lace ribbon - you might want to do it through the back cover rather than the front one.


The lace ribbon will keep the journal in place.


You can add more inserts the same way.


As you can see, the MDF covers are extremely versatile, so make sure you grab some from the shop and make your own books!!!


Friday, 28 February 2020

Who said hearts have to be red? MDF tag


Hey everyone! 
Today, I'd like to share with you my MDF tag with GREEN hearts. 


Yes, GREEN - anyways... who said they have to be red?


Start by glueing the greyboard hearts to your MDF tag - this is to add dimension.
Then paint it with a base colour - as usual, I used ivory but white will be just as good.


Next, use the hearts stencil and run texture paste through it - but only on the hearts.
It might be a bit tricky but you can clean up all the excess when taking the stencil off.


Next is colour - I opted for two shades of fluorescent green.


Now decorations... Green and yellow flowers, some lace and green sisal (which you can find in Lisa's shop). 


Al you need to do is arrange the elements into a lovely cluster with sisal and lace as the base.


To 'spice it up', I have also added some purple buds, glass cabochons and outlined the edges with a white acrylic pen.

Your tag is finished and... looking awesome in green :)

See you next time.