Showing posts with label #lisahortoncraftdt. Show all posts

Sunday, 14 June 2020

Christmas Shadow Box

Hello everyone.
Dawn here with you today.
Did you all watch Lisa's fabulous shows on Friday?
I hope you managed to grab some time to watch and maybe place a cheeky order!

Today I want to show you my little Christmas Shadow Box I made for the show.

The shadow box is one I had from the fabulous Danny McIntosh ages ago now and it has sat in my craft stash ever since.

So, what better way to use it than to decorate it with Lisa's fabulous products.

To begin with I painted the whole of the box frame with Metallic Copper acrylic paint.  Then, using the crackle stamp I stamped all over the front of the frame in black ink.

It looked nice but I decided I wanted it to look a bit "aged" so I used some Stamperia Antique wax in Metallic Gold, Metallic Black and Metallic Turquoise and used an old cloth to wipe it over the front of the frame in different places.

For the inside of the frame I painted it with Paper Artsy Fresco Finish Acrylic Paint in Cheesecake and then using the Medieval stencil from Lisa Horton Crafts went over that with the same Metallic Copper Acrylic paint to give me a fancy background.

Now I wanted the flowers to be 3D in nature but I knew that 3d glue gel wouldn't give me enough height.  So I cut up some pieces of polystyrene and stacked them to give me the height.  

Then in order for the flowers to be at different heights I attached wires to the back and stuck them in the polystyrene so it couldn't be seen.

Then I used one of the new Christmas wordage sheets and used one of my copics to add a colour that matched my project.  

Finally, I found some little bells in my stash so I added some of those to a piece of thread and strung them across the opening, so it now jingles each time you move it. Very festive.


All of the Christmas products I have used on this project are available exclusively at Create and Craft for the next two weeks and thereafter will be available at That Craft Place.

Remember to join in with the monthly challenge the theme for which is "Sets of Three"

Please consider subscribing to our You Tube channel - Lisa Horton Crafts and remember to check out our Pinterest boards.

Lisa will be back on our screens on Tuesday 30th June with some more fabulous new goodies but I will remind you all again in good time.
So, enjoy the rest of your Sunday good people of blogland/craftland and I will see you all again soon

hugs
Dawn

Friday, 12 June 2020

Marvellous Mandala

Good morning all, hope you’re all keeping safe and well this June morning.
C:\Users\user\Pictures\2020 Samples\Lisa Horton\97376074_3178244122206845_5766861169683857408_n (2).jpg

I have created a card using the fantastic Create Beautiful Things stamp set for this blog post along with ultra-fine interference glitter and pastel pearls.
I stamped the half mandala onto the left and right edges of a 13cm x 13cm piece of white smooth stamping card and coloured with alcohol markers in shades of pink, turquoise and green but obviously you could use pencils or paints or your own choice of colours. This can then be attached to a piece of 14cm x 14cm so-ordinating background card and then onto the front of a 15cm x 15cm blank white card.
C:\Users\user\Pictures\2020 Samples\Lisa Horton\97376074_3178244122206845_5766861169683857408_n (3).jpg


Stamp the medium sized mandala onto a piece of smooth white stamping card, colour and carefully cut out. Apply glue with a glue pen to some areas of the mandala ( in the small sample above you will see I have added the glue to the pale pink areas) and sprinkle with glitter, tap off the excess and leave to dry before attaching centrally to the front of the card with 3d foam pads or silicone glue. Attach a large pearl to the centre.
Finally stamp the ‘just for you’ and ‘with love’ sentiments above and below the central mandala.
Happy crafting

Sue xx

Thursday, 11 June 2020

Christmas In June

Lisa Horton Crafts - Christmas in June

Hi everyone, Jane here!

We’ve almost reached that time again, and I know Lisa and the design team are so excited for her next live shows on Create and Craft.
The live shows can be found online here, or watch on the following:-
Sky channel 683
Freeview channel 95
Virgin channel 748
Freesat channel 813
Apple Tv
Amazon Fire
I tend to watch online on my tablet while crafting 😉

The Christmas shows have already started and tomorrow it’s our Lisa’s turn, and she will be bringing you a huge range of seasonal goodies to get you into the Christmas mood.

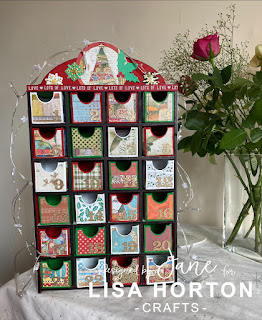
We have MDF advent calendars, paper pads, stamps, more mermaid tails and sooooo much more, so be sure to tune in at either 7:30 am or 11:15 am or even better, catch both shows for demos and ideas.
The full range from Lisa Horton Crafts can be found here.
Don’t worry, if you miss both shows, they can be watched online on catch up. Also keep an eye on our group where links to the catch up shows will be posted.
Lisa will have some amazing demonstrations lined up, and I think I speak for the entire design team when I say, we’re all buzzing with excitement.
Two weeks after the live shows on Create and Craft, you will be able to go shopping here if you prefer.

I had so much fun building and decorating my advent calendar. I used traditional colours and the Make A Wish Christmas papers from Stamperia.

You can find more ideas for Christmas from the DT on our Pinterest board here

If you’re looking for some tips on how to use your LHC stash, you can find it all over our social media channels, all of these are listed below:-
And you can always follow all the design team on Instagram by searching #lisahortoncraftsdt where you will find all of our fabulous projects.
Take care and lots of love
Jane xoxo

Monday, 1 June 2020

Distressed Postcards


Hi everyone, welcome back to my blog post. 
Today I'm going to be using Lisa's postcard background stamp as the main focus of a pretty card which would 
be suitable for so many occasions.
You will need: 
Lisa Horton sisal
Lisa Horton Luxury Pearls - Rainbow Collection Cool Skies
Stamperia Roses and Laces paper
Distress Oxide inks (or your preference)
Paperclip and lace (optional)
Start by stamping the postcard twice onto some cream card. Holding the stamped image, tear the card edges 
towards you to reveal the core of the card on all sides. Next, use your inks to colour those edges - front and back 
as you will be curling the edges up.  Use Distress Oxides (old paper and just a touch of vintage photo) to give a
vintage feel to your project. I decided to make the postcard underneath darker with a touch of salty ocean 
Distress Ink. Curl the bottom right corners by rolling them around a pencil.
Next I used a portion of 1 sheet of Stamperia Roses and Laces paper pack. I tore the edges and inked them 
the same as the postcards. 

Mount the backing paper onto a cream card and tape the postcards on top. I added a heart shaped paperclip
(from my stash) too.
Stamp your trailing foliage and colour the leaves with ink. Use a brown pencil/pen to darken the stems and then 
cut out your images. (I stamped 2 of the smaller sections).  Slightly curl the edges of the leaves to add a more 
realistic look and then use 3d foam to attach to the edge of the postcard. Remember to only glue the leaves at 
the top if your flowers are going to sit in that area.

Take a little sisal and attach with glue in the area that your flowers will sit. Die cut your flowers - I usually cut 3 for 
each one to add dimension. Layer them up with 3d foam. I used Lisa's newest collection of hombre pearls to give 
a beautiful finishing touch to the daisies, and added a little paper lace from my stash too.

Hope you've enjoyed making this project with me. Feel free to comment on my post should you wish to do so.

Stay safe and happy crafting! 
Tina x


Friday, 29 May 2020

Sunshine Tag

Sunflower Tag by Jane Robinson


Hey there!
Welcome back to our blog.
I’m Jane, and have recently joined the Design Team for Lisa Horton, and I’m here today to hopefully inspire you to try this project or something similar. Give it a go, then post in our group, and perhaps tag me with your amazing creation.
This quick and easy project will have you exploring your creativity in no time. Most of the products I used are from Lisa Horton Crafts, and can be found here


I started off by looking in my stash for a tag like base. I came across
some oval shaped card. I suddenly remembered; I’d saved these after buying some new socks. I’d bought some of those little trainer socks from Primark, and the socks were displayed over them. I kept them thinking they would come in useful someday.
Well… someday arrived, and I quickly dug out my stencils, acrylic paints, and other crafty goodies.

First step:
I laid a base coat of white gesso, even though the tags were originally white, they had a shiny surface. I need any medium I use to adhere well, so gesso is definitely the way to go, as it provides a primed base which will take anything your crafty hands will throw at it.
I used my heat tool, on the number one setting to dry.

Step two:
I used Lisa’s ‘Pennies In A Line’ stencil and Decoart Marigold Acrylic paint to create the background. The paint was applied sparingly, using a make-up sponge.

Third step:
I mixed some of Lisa’s Sunshine Mica Pigment Powder with some gritty structure paste, and a drop of ink refill in a summery yellow colour. Then pushed that through LHC ‘Spring Bloom’ stencil.

Step four:
Make a brew while the structure paste dries :D

Step five:
I used a finger dauber to colour the centre of the blooms with a dark brown shade of ink, used the same colour to stamp the script using LHC ‘Textures’ stamp set, and also ink up the edges for a distress look.

Sixth step:
I cut apart one of the white sentiment strips from LHC ‘Wordage Sheets’, coloured it with the same acrylic paint, and adhered using 3D silicone glue.

I finished it off with a brown cord tie.

Thanks for taking a peek today, be kind to each other.
Jane xoxo


Monday, 25 May 2020

Rustic Round Storage Box


Hello and thank you for joining me for my first ever blog post.


Today I am going to show you how I made this gorgeous round Rustic Round Storage Box. 


You may have seen one I made for Lisa’s show back in April. Well I loved it so much I thought I would make another!


I started by using a black marker pen on the tabs as I found last time when I painted them that they can cause the tabs to expand a little so it just makes it easier when it comes to assemble at the end.


I then painted it all in black Gesso.


There are 8 sides to the box so I decided to use Lisa’s Wood Grain Stamp and also her CrackleStamp on these. I did 4 of each and embossed them with a brown embossing powder followed by some gilding wax to add to the texture.

I also embossed the top and bottom of the box with the Crackle Stamp… it looks so effective!
Next I took some substrates and gave them a thin coat of black gesso too.


I wanted to give the effect of mini doors and the Hinges and Locks work beautifully for this.
To get the rusty effect, I first used some Cosmic Shimmer Strata Paste. If you have never used this before, it gives a rough, gritty feel to it. 


I then used some Cosmic Shimmer paint in a Teal colour and sparingly coated some of the area where I had put the Strata Paste. 


Once dried, I then used some ArtDeco Transparent Yellow Iron Oxide and painted over some of the Teal paint.


Finally topped off with a coat of Quinacridone Gold and the rust effect starts to come together.   


I added some Brads to the Hinges and a drop of Alcohol ink to tone down the colour as they looked a bit bright. It gives such a gorgeous effect!

For the other 4 sides I wanted to add Some of Lisa’s Wings and Cogs, I followed the steps above for the Cogs too.


For one set of wings I used some glue to stick down some micro beads, these are great to add texture to projects.


For the other set of wings I used some Cosmic Shimmer Lava Paste. This is great stuff!! I used a thin layer and heated it to get the bubbly effect.


Once done I made a thin mix of White Spirit and Brown oil based paint to paint them. The Lava Paste soaked up the mix wonderfully and gives a great look.


I had some Skeleton leaves in my stash, I distressed them a touch with Ground Espresso distress ink. They are very delicate so you need to be very gentle with them. I placed these behind the Wings with some of Lisa’s Pink Sisal which I sprayed with brown Distress ink first and added the cogs. 


I do love my Gilding Waxes so generally go over it here and there until I feel I have the look I am after. I also added a few little keys from my stash too.


Once done, I was able to assemble the box together and I added a little metal knob on top.


I just loved doing this project!! I hope you have enjoyed this blog and I hope I have given you some inspiration to make your own Round Storage Box... 


Thank you for stopping by. 


Much Love Nicky xx


Monday, 11 May 2020

Butterflies in the round.

Hi all,
Me again. Lol
Today I wanted to show you how versatile Lisa's fabulous stamps can be.

My team mates are such clever folk when it comes to decorating the wonderful MDF creations that Lisa and Danny come up with and I have to say I have learnt such a lot from them all.
MDF STORAGE TUB
However, with this gorgeous Arty Storage Tub I didn't want to use papers so I chose to paint it with a pearlescent acrylic paint.  In this case I used DoCrafts Artiste Pearl Acrylic Paint in Ice Blue.
I used two coats to ensure a good coverage but it went on beautifully.

Once it was dry I laid out all the side pieces of the box and secured them in place with some masking tape across the back of them so they didn't move.

Then I used the fabulous Jewelled butterflies, the trailing foliage and the sentiment from the Jewelled butterflies set.  I stamped them out as if it was one piece of board and once the ink was dry I took them off the masking tape.  Then it was just a case of putting the box together.

The beauty of all the fabulous MDF products that Lisa and Danny bring to us is the ease of assembly, they are just wonderful.  

For the top of the box I didn't want to just leave it plain so I used Lisa's fabulous Four Point Blooms die set and cut a flower from one of Lisa's gorgeous paper pads, Bali in this case.
Then I used the Butterfly Flourish die set and cut a butterfly in the same paper then added both of these to the top of the box.
The lid handle was made from a discarded necklace and secured on the underside of the lid.

So there you go, a quick and simple way to decorate this fabulous Arty Storage Box.  
I am sure there are hundreds of different ways to do this and it would be fabulous if you have one, that you could pop it on the Facebook Group so that we can see it. 

Not a member of the group yet? 
Then please follow the link and request to join - please remember to answer the two questions or your request will be declined and we really want you to be able to join in with all the fun. 

You will see some more examples of decoration on the website, just follow the link at the top of the post.

Lisa will be back on our screens on Create & Craft, Sky 683, on Friday 22nd May at 9:45 and 15:45 and I promise you, you won't want to miss these shows - they are going to be AWESOME!!

Remember we have boards on Pinteret too - just search Lisa Horton Crafts for oodles of inspiration.


Monday, 4 May 2020

The lovely butterfy

The lovely butterfly

Today i will show you how i made this card with the lovely butterfly stamp on a gelli plate.

I used the following products from Lisa Horton:


- 


At first i used the distress oxide stamp pad, and coverd the gelli plate with the ink.


Next i rolled over the gelli plate to cover the ink over the whole plate.


Then i used the lovely butterfly from Lisa and stamped it with two other distress oxide paints.


Then i stamped the stamp carefully on the gelli plate. To create an impession of the coloured butterfly on the plate.


The stamp imprint you can put that on a blanc peice of paper.


Then take a white peice of paper and lay that on the gelli plate. Carefully rub it and pull it of the plate. And thats your background with the butterfly.


Next i cut out the stamped image from the butterfly.


Now i took some glue and put some lovely white mermaid tails on the butterfly and let that dry.


In meanwhile stick the background on to a black peice of paper, that should be slightly bigger than the background paper. And that together i put that on a slightly bigger piece of white cardstock.


Then glue the butterfly its body on the body of the butterfly from the background card.


Then stamp the background with the texture stamp to add some depth to the card.


As last decorate the card with some pearls and you can add a sentiment to it. And voila a lovely butterfly card is created.


Thank you for visiting our blog and reading my blogpost. Please leave a comment if you like it.

And don't forget to join this months challenge. And join our facebook group https://www.facebook.com/groups/468312444069507/


Blogger               https://bobomadebyart.blogspot.com/