Showing posts with label Tina Foster. Show all posts

Thursday, 21 May 2020

Tina's mad about flowers


Hi everyone, thank you for joining me for my latest blog post. 
You may have noticed that I really love to make 3d flower boxes.  They can look so different depending on the flower shapes you choose and the endless possibilities with colour variations. They fold flat for posting and are guaranteed to bring a smile to the recipient!

This particular flower box was featured in the last issue of Die Cutting Essentials (issue 64). If you didn't see it, here are my instructions on constructing the box and the flowers using Lisa's lovely products.


 To make the flower box, take a sheet of 300gsm card - this will make sure your box is nice and sturdy. Place the card in landscape position and score from top to bottom at 7cm, 14cm, 21cm and 28cm. Next, turn the card to portrait position, and with the narrow score line at the top, score down the middle of the card at 10.5cm, but stop on the last score line. This will ensure the back of the box stays in the upright position. Now cut along the 7,14,21 and 28cm score lines to the middle score line only. Cut off the narrow section to the central score line on the same side as your cuts. Leave the other side of the narrow section in place, as this will form the tab to connect your box together. 

Next you can fold along your score lines to form your flower box. Use red liner tape on your tab as it’s nice and strong, then attach it to the inside of the back of the box. Cut 3 pieces of card 8.5cm x 2.5cm to make the tabs to hold the flower stems in place.  Score and fold at 1cm on each end, add red liner tape to these ends and place at equal distances across the middle of the box opening. 
TIP Each time you stick a tab in, fold your box flat one way and then the other way to achieve a nice flat fit. 
To decorate the box flaps I've used Lisa Horton's Nested Flags die set. The base flag has been cut from American Crafts card and the smaller has been cut from Lisa Horton's beautiful Capri papers. I've used Cosmic Shimmer glue throughout this project. 
Next cut a selection of flowers in various colours. You can use one flower or several to form layers and add depth to your project as I have. The flowers have been cut from Lisa Horton's Daisy Burst Edgecutz die set. Stick the layers together using foam pads to add further dimension. The flower centre circles are actually the waste from Lisa Horton's In the Loop Edgecutz dies. 

Make the stems with your 300gsm card - cut strips of just under 1cm (I added some green paper, but you could colour them if you wish). Attach the flowers to the stems with glue. 
TIP Place your stem between two flowers to give a neat look front and back and place the stems one at a time in the desired position on the bars. 
TIP Make sure you fold the box flat each way to make sure the flowers don't stick out of the sides in the flat position.

I've added dimensional butterflies in different sizes from Lisa Horton's Butterfly Flourish Edgecutz dies and popped them in various positions on the box flaps. 
TIP I wound some thread around the 3 butterfly layers and stuck down the bottom butterfly only.  I've added a little finishing touch of sisal from Lisa Horton which just sits between the bars in the box.
Products Used:
Lisa Horton Crafts Edgecutz Collection In the Loop (Currently out of stock)
American Crafts Cardstock 216gsm
Smooth white Cardstock 300gsm
Cosmic Shimmer Glue
Red Liner Tape
Foam Pads
All of Lisa's products are available from 
Thanks for visiting today 
Tina x 

Wednesday, 15 April 2020

Easel Card By Tina Foster


Hello everyone, its great to see you're taking a look at my latest blog. Hope you'll enjoy creating this one with me. For this project, I've put together a very simple easel card using the fab new products from Lisa Horton. Of course, by using the lovely banner dies you can create any message and personalise too, making it extra special for the recipient.


Tools 

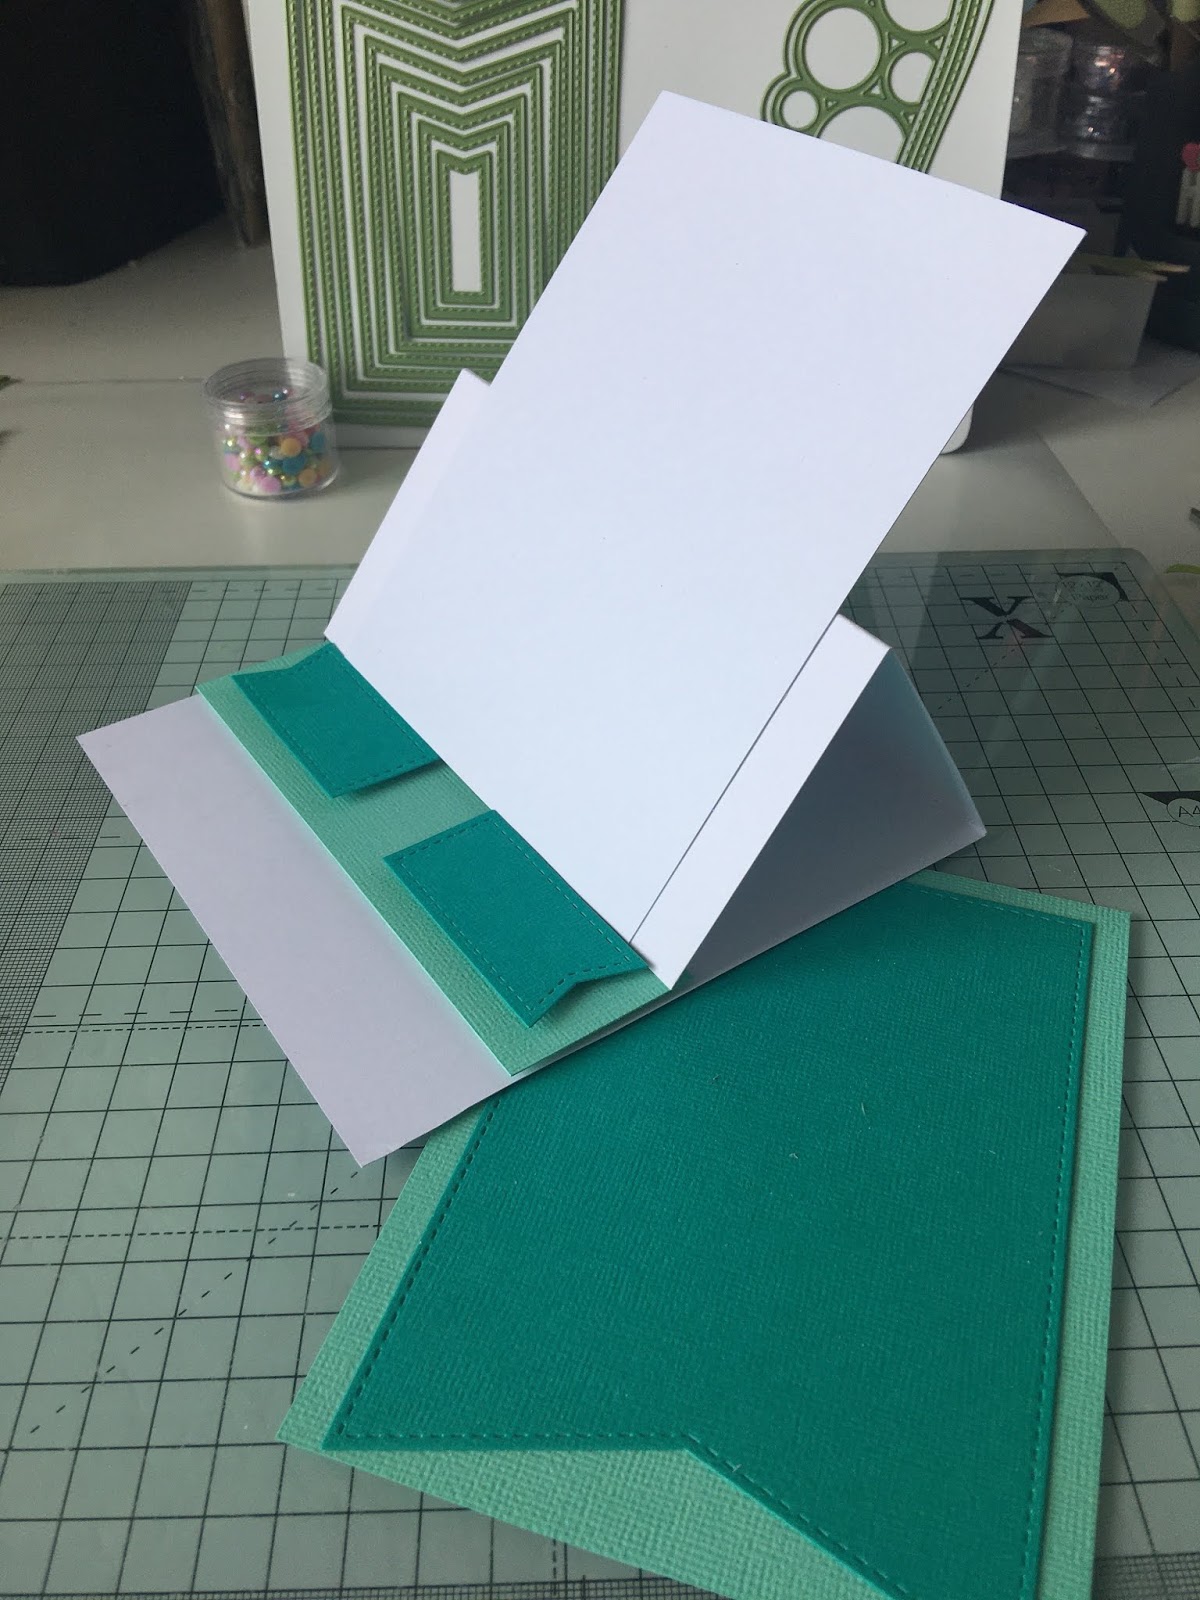
Start by taking (or making) a card blank.  The blanks I'm using measure 15cm x 15cm.  I always use 300gsm cardstock for the base card to make it nice and sturdy. Score down the middle of one half and use a bone folder along the crease to give a nice fold.
Next use the nested flags die set to cut 3 flags in your darker main colour shade. Cut 1 of the largest flags and 2 of the second smallest. Cut the contrasting lighter shade backing a little wider than your large flag (11cm x15cm) and stick onto the back of the flag leaving a border at the sides and top edge only. Now take some more white base card (15cm x 12cm) and stick this to your easel making sure when you lay it flat its the same height as your card. Wait to stick your flag onto this as you'll want to pop the strings of your banner between these layers when you're ready.

For the easel stopper cut a piece of the lighter shade of your colours measuring  15cm x 4cm. Stick it onto your card with foam tape leaving a white space underneath it measuring about 3cm. Add your 2 small flags, again with foam tape.

Next die cut your flower layers, your swirls, leaves and banner letters for your message on the card.
Put your banner together using glue. I always put the string inside the two layers for a neat finish.

Curl the edges of your flower and leaf die cuts with scissors and layer up your flowers with foam tape to add dimension. 
Stick the flowers in your desired position On the card, leaving enough space for your banners. Add your banner(s) securing on the back with 3d foam and pop it on to the easel with an equal margin at each side.  Glue the flourishes to the small banners and use foam tape to secure the remaining flower to the middle of the stopper.

Use a corner rounder to soften the bottom corners, and use Lisa's beautiful new ab pearls for a touch of elegance. And to add a little love to the message, I decided to pop on a couple of little hearts from my stash.

I hope you found this project helpful, and that you enjoyed a little crafting therapy! Until next time, please take care and stay safe x
Tina x

Tuesday, 17 March 2020

Tina Foster - The Spring Hanging Basket


HI everyone, its great to know you're taking a look at my latest blog for Lisa Horton Crafts. Thank you so much for joining me.  I decided to have a spring theme this time, and thought about what I like most about this time of year. Hanging baskets make a lovely display in the garden, and they will also form a pretty card too.


The Spring Hanging Basket

Tools
Nested Flags Die Set
Daisy Burst Edgers Die Set
Four Point Flowers Die Set
Four Point Flowers Stamp Set
Ticker Tape Sentiments Stamps
Green Sisal
Corner Rounder
Distress Oxide Ink Pad - Squeezed Lemonade
2 Eyelets

I started my project with a 5inch x 9inch card blank, and shaded the centre slightly with a Distress Oxide Ink Pad in Squeezed Lemonade to add a little interest in the background.

Next I die cut my basket by taking a flag die, use the 5th largest one and cut it with a trimmer as shown in the photograph. 


Do this 3 times and then stick them together as shown.


Make a hole on each side of the basket for your eyelets and pop one on each side in the colour of your choice. Add double sided foam tape to the back of the basket after shaping the sides with your scissors - to give it a little dimension. Stick it on to your card.

Next, I used the the largest of the nested flags die and cut out 3 straight pieces for the hangers. I thought i would do it this way to get the stitched detail.


Push one end through the eyelet and fasten to the card with glue, making sure it is pointed to the centre of the card. 

Attach the middle one directly to the card. I took a little of the green sisal and popped it on the card above the rim of the basket with a little glue. 

Die cut your flowers in the desired colours. I used mostly the daisies with just a couple of the four point flowers. 


Stamp your leaves and then die cut them curling the edges to add dimension and place them amongst the flowers.


Die cut two of the smallest flags, stamp your message using the ticker tape sentiments and add to the flags, then use foam tape to attach to your card. 

Finally I cut 2 of the four point flowers and mounted them on foam tape. I stuck down the hangers leaving a little slack to drape over the flowers and placed the four point flowers over the top!

Hope you’ve enjoyed making your spring basket! Until next time, happy crafting!!! 🌸

Sunday, 9 February 2020

Tina Foster - Be the reason someone Smiles Today


 Hi everyone, a very warm welcome to my blog post!

For my second blog post  I'm going to make a card featuring some of the yummy new products just launched  by Lisa Horton, and I've gone all pink! However, if you're not a pink person, you can choose colours that appeal to you, or the recipient. That's what so great about paper crafting, you can make a project really personal for that special occasion.

First of all take a card blank or make one yourself. I've used a 6x6inch card blank. Try to work with a nice quality card, personally I like to use at least 300gsm for the base card, which will stand nicely and take your glue plus further layers of card and embellishments.


Next I cut 2 more pieces of card - one in white (4.5x4.5inches)and a second in the main focal colour (5x5inches).  I've then used the Tartan stencil - new release by Lisa, launched on Monday with 3 colours of Distress Oxide inks (tattered rose, worn lipstick and picked raspberry). I placed them at jaunty angles and used a corner rounder punch to soften the edges. I glued them onto the card.

 Cut 2 more pieces of card 3.5x2.5inches in grey and one about 0.5inch smaller using your white stamping card and again use your corner punch to match the other squares. Stamp your sentiment using the Be Happy phrases  and then colour the edges with Distress Oxide picked raspberry shade. Glue them together and use foam pads to attach to your project

Cut as many flowers as you'd like in 2 of the shades of pink you've used in the stencilled background. I used very similar colours from my stash of American Crafts cardstock. I cut several layers for each flower, and shaped the petal by running a pair of scissors across each petal. You could also use a ball tool if you prefer. The layers have been stuck together with foam pads and each flower has been stuck to the card using a hot glue gun (so that they can be placed at angles). The leaves have been shaped in the same way as the flowers and have been cut from a previous collection from Lisa called Cut and Lift Pansies. I've glued them on, sliding them under the flowers in the desired position.

The finishing touches of buttons and heart paperclip were amongst my stash, but you could add a standard paperclip which I think would like equally effective.

Thank you for your interest. I do hope you've enjoyed my project, and hope it’s made you smile today! Looking forward to any your comments you’d like to make. Until next time ..... happy crafting! 

Tina 🌸

Friday, 17 January 2020

Tina Foster - Quick & Easy 3D Flowers Card

Quick & Easy 3D Flower card

This is how to create and attach 3D flowers to a card with an ink stencilled background. This is a really easy design to create that looks beautiful. The best part is the card can be folded flat for posting!

(1) First choose your card size. 
I have used a 6inch x 6inch card blank. I personally use 300gsm smooth white card stock as it has a bit more stability.

(2) Cut out a smaller circle on a spare piece of card. 
You will use this to stencil onto your card blank.


(3) Select a stencil design and start by placing the cut out circle on top of the card base. 
I have placed it in a central position, but you can always have it anywhere of your choosing. 
Make sure you tape the stencil down using low tac tape.

(4) Select your ink colours. 
In this instance I've used distress oxides in hickory smoke and mustard seed. 
When you are adding your colour make sure you are holding your stencil firmly.
As a tip, I use make up brushes to apply the ink as they don't leave any harsh lines for those who are a little more heavy handed. 
 
(5) Colour and cut out 6 of the large flowers from the Daisy Burst dies and score each flower down the middle.


(6) Fold each flower in half, lining up the petals to match. While they are still folded flatten each flower along the folded side with a bone folder for a nice crisp edge.


(7) Stick 2 of the half flowers (with each flowers folded side in the middle) with strong glue. 

(8) Take another half flower and glue to the left of the flower you just made. This will be your first 3d flower done.

(9) Repeat 7 and 8 as many times as you wish for as many flowers as you would like on the card. I have created two 3d flowers for this particular card. 

(10) Cut or draw some lines for each of your flower's stems. 
If you have cut stems out like I have, use your strong glue to attach them to the card blank.
(11) Using your strong glue, attach the 3d flowers to the card blank. 

(12) Stamp out the sentiment from the ticker tape phrases stamp. 
In this case I have added a tiny heart cut out. 

(13) To finish I added a self adhesive gem with a little sparkle to my cut out heart and inside my flowers to add that extra something. 


I hope you enjoyed making this project with me. 
Please feel free to post any of your work or comments below! 

Monday, 13 January 2020

All about me Tina Foster

- Meet the Team - 
Tina Foster 


Hi, my name is Tina, and I live in Bickley with my husband Paul, son Harry and our much loved cat Millie! I work two jobs - and have done so for the past 16 years. I work within a Primary school amongst children aged between 5 and 7, then I put on my other hat and work in a well loved high street store dealing with the general public. Part of my job there involves making up bouquets of flowers for customers who would like an alternative selection to our standard range - which I enjoy very much.

I've always loved to make things. I think it started when I learnt to crochet aged around 8 when I made a little teddy bear! I went on to knitting too which was patiently taught by my mum.

I first started paper crafting around 18 years ago, when my son was young and I stumbled across the shopping channels selling all the crafty goodies - I purchased a card making kit and  I was hooked! Over the years my crafty stash grew and grew, but thankfully I have my own craft room to play in now! 

Die cutting is predominantly my thing, and I have a love of patterned papers. If possible, I like to have one to use and another to drool over! I enjoy using stencils and working with inks, really loving the variety of patterns and tones you can achieve. I like stamping, using embossing folders and love to create 3d projects.

I can't tell you how excited and privileged I feel to be part of Lisa's design team from the start of her 2020 journey. I've always loved her style of products and her passion for crafting. I'm looking forward to all the excitement this year will bring - the inspiration from both my teamies and all the other lovely crafters as we all enjoy the fabulous new range from Lisa.