Showing posts with label Crafting with Lisa Horton. Show all posts

Thursday, 18 June 2020

MANDALA CARD


    Welcome to my blogpost for Lisa Horton Crafts

This time I made a card with the lovely mandala Stencil. Enjoy this tutorial, and at the end of the tutorial I have a video link where you can see it in speed on You Tube how I made this card.


At first I made two of the same cards with the mandala stencil. I used the following distress ink's: Picked raspberry and worn lipstick. I used a blending tool to apply the ink.


So now I have two of almost the same cards.


In the next step I divide one of the cards in 2cm peices.


I take the strips alternately, and place them on the card on the same spot as the background stencil so it matches. And stick them on with foam tape or you coud also use 3d glue.


After that I splattered some dylusions ink over the card and I cut out a bold word from the new bold wordage stamps (aren't they wonderful).


This is what it looks like up close.


And I weaved through a peice of net curtains that I had as a leftover , and I made a little bow with it.

And voila here is the finished card.


I have also a video tutorial below here, so you can see how I made this card.


And below here I have the same card in a different colour.


Thank you for visiting my blogpost. I hope you enjoyed my tutorial.
watch for more inspiration on  Crafting with Lisa Horton. There are a lot of projects over there from me and my other lovely DT members.
A comment on what you think of my blogpost would be kind, but it's not required.

All products can be bought at That Craft Place Ltd


I wish you a lovely day and if you decide to make something similar feel free to share the photo's of your project on the facebook group or instagram and tag me @bobomadeby


Wednesday, 17 June 2020

Versatility of Mandala stamps and stencils


Hello, and welcome back to the Lisa Horton Craft blog, Claire Newcombe with you today.

Today I'm sharing with you my projects from each of my FB live events throughout the month of June so, plus the first look at a card scheduled for 23rd June.
Each of the projects in the photo above have been made with the June challenge theme in mind, and will be sent to the winner of June challenge which is 'SETS of THREE'

The theme can be interpreted in any way you choose, whether it be adding three elements on your project, or maybe making three ATC's, a set of three co-ordinating projects....your choice, have some fun with it.


There is another way in which all the projects made are linked, and that is that they all feature the fabulous Mandala collection of stamps and stencils....all of which are now available from Lisa's website

I wanted to create a selection of very different projects, demonstrating just how versatile the Mandala designs can be and how well they slot into Lisa's whole repertoire of products.

ALL FB LIVES FROM DESIGN MEMBERS CAN BE FOUND ON OUR NEW YOUTUBE CHANNEL, FOLLOW THE LINK TO SUBSCRIBE

I have attached the Youtube links for the projects that I have already created, if you would like to make them yourself.

1. Facebook Live 2nd June (YouTube https://www.youtube.com/watch?v=QeED11ESUOo)
I have created a set of three ATC's (artist trading cards) in a very feminine style. The mandala stencils feature in the background as a beautiful backdrop for the A5 Foliage stamps.
You will see on the middle card the mandala pattern has been clear embossed as a design feature. 


----------------------------

2. Facebook live 9th June (YouTube https://www.youtube.com/watch?v=qBKU7Y0AhGE&t=498s)
These cards show the beauty of the Mandala stamps themselves, and the fun you can have colouring them.
But also how they can be used to create subtle backgrounds, when stamped with clear embossing ink onto coloured card for a tone on tone effect.


------------------------------

3. Facebook live 16th June (YouTube https://youtu.be/2XeqCWhlb2Q)
The mandala stencils are layered here in the background with Lisa Hortons Woodgrain background stamp, and Mandala stamps highlighted with mica powder.
It is important to show that all products released into the Lisa Horton range will be able to mix and match with each other.


----------------------

4. Facebook live scheduled for 23rd June
This project uses the mandala stencils in a more familiar way, layered up to show their beauty. I have used the circle stencils with. distress ink to create a background. The  'grungy' details have been added using Lisa's A6 Texture stamps.
I hope you can join me next week when i demo this on a FB live 


Thank you so much for stopping by, I hope this has made you smile today.
Remember we have a lovely Facebook group where we'd love for you to share all your makes with Lisa products, I'll pop the link just here


Take care of yourselves x

Sunday, 12 April 2020

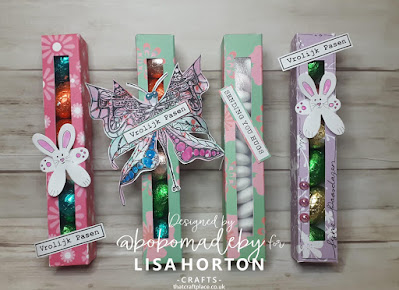
HAPPY EASTER EGG BOX

HAPPY EASTER

Hello everyone I wish you a happy easter. This is my blogpost for this month and i made a little box for easter eggs.


 At first you can print the template that i placed below at the blog.


When it is printed on a carstock paper or if your printer does not print thick paper just print it on printer paper and glue it on the back of a nice paper of choice.


The next step is to cut it nicely, and only cut the outer lines.


Then you score the lines of the box


Cut the peice out, this should be a window.


Glue the box and wait untill it has dried.


Then glue one side of the box at the end and the other one you will 
leave that open so you can add the eggs or candy,
 what you like and.
close that side with a peice of tape.


The Easter Bunny's


these are made with the lovely Daisy burst dies from Lisa.

Here is How to make them.

At first you cut out the largest Daisy Burst flower.


Then you have to fold the two middle pettals to the back, and then fold them in half back again.
That will be the paws.


Then take a fine tip liner and draw the inner peice of the ears, the little face and paws.
Colour the inner ear and the paws pink. And voila you have a cute little bunny to put on this easter box.

If you want to see how i did it watch the youtube tutorial and there it will be shown how to maken them.

And you can also take the lovely butterflies colour them take one of lisa her phrases or words from 
the word pad or ticker phrase stamps and make it a little candy box for a birthday.


And Voila you have a nice box for easter eggs or if you want to use it for candy, you can add a peice of plastic on the inside of the window. 
Just watch the you tube video tutorial.And you can decorate the outside with some extra's like the bunny's or butterflies from Lisa Horton.


 My live video tutorial on youtube can be found thru the link below:

                                                            https://www.youtube.com/watch?v=syJC5-HlunA


                     Downloadable Template for the Easter Egg Window Box designed by. Natasja Boseker


                                                                                                                               Feel free to comment beneath and follow my facebook, instagram, youtube etc.
                                                                                                                       These all can be found on google just type @bobomadeby and i can be found on all media.


Blogger     https://bobomadebyart.blogspot.com/        


Sunday, 5 April 2020

Beautiful Butterflies in the spotlight


Hi there, Claire Newcombe back with you and sharing a project I created for the most recent of Lisa's Create & Craft shows, aired on 3rd April.

I created this peach card using the newly launched butterfly's designed for Lisa by the wonderfully talented Anne Ruffles.

This particular butterfly is from the Wings & Things set, still available in a couple of bundles and still exclusive to C&C (link below)


Today on the blog I have created this blue card, in the same style and with a step by step walk through for you. I will also be going live on Facebook on Tuesday 7th April recreating this card in real time too, it will be great if you can join me.

1. Wherever I can i like to work on Lisa's super smooth cardstock, not only is it great for stamping, it is fabulous to blend your inks on to also. To start I applied a small amount of light (tumbled glass) distress oxide through one of the newest stencils (Lisa's A5 stencil, Medieval design)


2. I cut a circle mask (3.5 inches wide) from copy paper, placed it on the project and then replaced the stencil over the top again. I made sure I pattern matched the stencil to the design already on the project. I tend to just hold the masks and stencils in place when I work, but you can of course use your preferred method to make them more secure before applying the ink.


3. As you can see from the photo below I now work a darker shade of ink ((broken china) round the outside edge of the circle and through the stencil.


4.Introduce another shade (iced spruce) to add some shadowing and continue building colour around the outside edge of the circle mask. When you remove the mask and stencil to reveal, you should have a highlighted circle. If you feel you need more depth of colour and shadow effect replace both mask and stencil and continue adding colour.


5. Use a fine liner pen to draw doodled lines around the outside edge of the project and also the highlighted circle. You now have a background ready to frame the main focal image of your project. I have chosen one of the butterflies from the beautiful 'Jewelled Buttlerfly' Collection, amd coloured it with alcohol markers. Ive added some sparkle with the new collection of mermaid tails, and stamped one of Lisa's Ticker tape sentiments.


Lisa Horton Crafts products,
A5 Medieval stencil
Jewelled Butterflies
Just Saying..Ticker phrases 


Thank you so much for stopping by, I hope this has made you smile today.
Remember we have a lovely Facebook group where we'd love for you to share all your makes with Lisa products, I'll pop the link just here


Take care of yourselves x

Saturday, 21 March 2020

Just Because card


Hello everyone.

Sharing a card using Nested Flag and Four Point Blooms flowers and new background stamp and of course gorgeous new mermaid glitters coming soon.


For the card
Lisa Horton Nested Flag dies,
Ticker phrases sentiment stamps,
Four Point Blooms dies and stamps,
New Knotted Woodgrain stamp,
New Mermaid white glitter,
Memento inks,
Clear embossing powder.
Card from Papermilldirect.

Make an A6 size vertical card from craft card.
Cut the largest Banner flag in black card. 
Using a stamp platform stamp the Knotted Woodgrain stamp into white card using three different brown colours for ombre effect. Cut it out with flag die slightly smaller then black flag, Mat and layer with black flag and glue to the craft card with foam pads.
Stamp flowers with purple ink and die cut. Build the flowers and add tacky glue to the center with glitter. For leaves stamp with green ink using stamping platform and stamp again with Versa mark sticky ink and heat emboss with clear powder. Die cut and blend green ink to the leaves. Add the flowers and leaves to the flag. Stamp a sentiment and cut out leaving white border, add to the flag on the top right side.


Don't forget to join Crafting With Lisa Horton group on Facebook for sneak peaks and where you can share your cards too.
You can find some crafty goodies on That craft place shop.

Thank you for stopping by and leaving your comments.
Crafty hugs Natalia.

Friday, 14 February 2020

Butterfly Hugs & Kisses

Hi Im Claire Newcombe (aka Creative Makings) and back today with an effective stamping technique for you.

I have used one of the Butterflies from the EDGEcutz Butterfly Flourish DL stamp set, and one of the beautiful papers that are due to make their debut in Lisa's next Create and Craft Show on 28th February.


1. Start my making some masks of the largest butterfly, by die cutting some post-it notes. Use these and utilise the sticky strip to keep them in place.....however Lisa is due to release her very own reusable masking sheets, so keep an eye open for that because they are brilliant to use.


2. Here you can see I have cut 4 masks, make sure you have plenty.Its very easy to cut more as you need them. The die is from the coordinating EDGEcutz Butterfly Flourish die set


3. Begin by stamping in the centre of the page and work your way out towards the edges, where you will eventually begin stamping off the page. 
Cover each butterfly as you stamp it, so that you can stamp the next butterfly and overlap.
Only remove the sticky mask when you are not stamping next to that image. 


4.  I am stamping onto Lisa's own design papers (coming soon) because I loved the dreamy effect the colours made - it meant that I didn't need to colour the butterflies, only highlight them.
This technique could easily be done on plain stamping card if you wanted to create a page for yourself to sit and colour.


5. Die cut a shape from the centre, mat & layer onto complimentary cardstock and replace back into the centre on 3D foam pads.
Mat the whole sheet onto black card before fixing to the front of a card blank.


 6. I have highlighted the central panel by adding some shading to the butterflies with colour pencils. You could add glitter or even glossy accents.
Ive also die cut one of the detailed butterflies (from the EDGEcutz Butterfly Flourish die set) as a three 3D element along with the sentiment.


I can't wait for you to see the beautiful papers that Lisa has designed. Their quality is second to none, and take ink brilliantly...whether its stamping, shading or blending.

Thanks so much for popping by. 
Remember to share your makes with us over in our friendly crafty Facebook group.


Tuesday, 11 February 2020

Keep Smiling


Hello everyone.

Sharing a card with embossed background using a Tartan stencil. These stencils are great to emboss card it gives deep embossing.


For the card

Lisa Horton Crafts Tartan stencil,
Butterfly flourish dies,
Stitched Scallop rectangle dies,
Ticker Phrases sentiment stamps,
Pearls and Sisal,
Distress oxide inks,
White card

Cut a stitched rectangle from white card. Emboss with Tartan stencil. 

Blend oxide inks randomly, I used peacock feathers, twisted citron and cracked pistachio.

Cut a scalloped rectangle from white card and adhere to the card base. Matt and layer the embossed rectangle with 3D foam pads on top of the scalloped rectangle.

Cut out three butterflies and adhere them to the coloured background, use green sisal and glue to the card before adding big butterfly on top. Add green pearls to the butterflies.

Stamp the sentiment with black ink, cut out leaving white edge around and adhere with foam pads to the front of card.


You can find more inspiration on our Facebook group where you can see design team projects and also can share your projects.

My blog Nataliascraft

Thank you for looking and leaving your comments.
Hugs Natalia