Showing posts with label #daisyburst. Show all posts

Monday, 1 June 2020

Distressed Postcards


Hi everyone, welcome back to my blog post. 
Today I'm going to be using Lisa's postcard background stamp as the main focus of a pretty card which would 
be suitable for so many occasions.
You will need: 
Lisa Horton sisal
Lisa Horton Luxury Pearls - Rainbow Collection Cool Skies
Stamperia Roses and Laces paper
Distress Oxide inks (or your preference)
Paperclip and lace (optional)
Start by stamping the postcard twice onto some cream card. Holding the stamped image, tear the card edges 
towards you to reveal the core of the card on all sides. Next, use your inks to colour those edges - front and back 
as you will be curling the edges up.  Use Distress Oxides (old paper and just a touch of vintage photo) to give a
vintage feel to your project. I decided to make the postcard underneath darker with a touch of salty ocean 
Distress Ink. Curl the bottom right corners by rolling them around a pencil.
Next I used a portion of 1 sheet of Stamperia Roses and Laces paper pack. I tore the edges and inked them 
the same as the postcards. 

Mount the backing paper onto a cream card and tape the postcards on top. I added a heart shaped paperclip
(from my stash) too.
Stamp your trailing foliage and colour the leaves with ink. Use a brown pencil/pen to darken the stems and then 
cut out your images. (I stamped 2 of the smaller sections).  Slightly curl the edges of the leaves to add a more 
realistic look and then use 3d foam to attach to the edge of the postcard. Remember to only glue the leaves at 
the top if your flowers are going to sit in that area.

Take a little sisal and attach with glue in the area that your flowers will sit. Die cut your flowers - I usually cut 3 for 
each one to add dimension. Layer them up with 3d foam. I used Lisa's newest collection of hombre pearls to give 
a beautiful finishing touch to the daisies, and added a little paper lace from my stash too.

Hope you've enjoyed making this project with me. Feel free to comment on my post should you wish to do so.

Stay safe and happy crafting! 
Tina x


Sunday, 10 May 2020

Flower Power

Hi everyone
Thanks for popping in to the blog today.

Today I am showing you a very simple, quick to make card which (I think) looks really effective.

So what do you need:
Ink pad colour of your choice

My card base is 7 x 7 inches so the three pieces of card need to be 6 x 6, 5 x 5 and 4 x 4.
I chose to use the two largest flowers and then the next size down.

Randomly stamp all around the edge of the cards, using the smaller set of flowers on the top piece of card.  Then go around the edge of each piece of card with a Sharpie Pen.  This is a quick way of making a matted and layered look rather than sticking it to pieces of darker card, which of course you could also do.

I stamped out the three sizes of polka dot flowers and then cut them out using the matching Dies.

Then I cut out the smallest and middle size banners and cut them down to the size I needed.  Layered them up and then added a phrase from the wordage sheets.

Finishing touch was to add a pearl to the middle of the die cut flower and attach it to the nested banner/sentiment.

You can find all these gorgeous products at

We also have boards on Pinterest where you can see the gorgeous DT makes along with some from our followers.

So, that's it for now.  See you all soon.
Happy Crafting.

xxx


Sunday, 12 April 2020

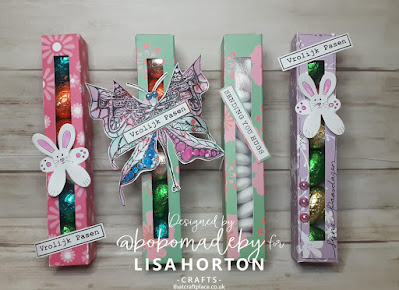
HAPPY EASTER EGG BOX

HAPPY EASTER

Hello everyone I wish you a happy easter. This is my blogpost for this month and i made a little box for easter eggs.


 At first you can print the template that i placed below at the blog.


When it is printed on a carstock paper or if your printer does not print thick paper just print it on printer paper and glue it on the back of a nice paper of choice.


The next step is to cut it nicely, and only cut the outer lines.


Then you score the lines of the box


Cut the peice out, this should be a window.


Glue the box and wait untill it has dried.


Then glue one side of the box at the end and the other one you will 
leave that open so you can add the eggs or candy,
 what you like and.
close that side with a peice of tape.


The Easter Bunny's


these are made with the lovely Daisy burst dies from Lisa.

Here is How to make them.

At first you cut out the largest Daisy Burst flower.


Then you have to fold the two middle pettals to the back, and then fold them in half back again.
That will be the paws.


Then take a fine tip liner and draw the inner peice of the ears, the little face and paws.
Colour the inner ear and the paws pink. And voila you have a cute little bunny to put on this easter box.

If you want to see how i did it watch the youtube tutorial and there it will be shown how to maken them.

And you can also take the lovely butterflies colour them take one of lisa her phrases or words from 
the word pad or ticker phrase stamps and make it a little candy box for a birthday.


And Voila you have a nice box for easter eggs or if you want to use it for candy, you can add a peice of plastic on the inside of the window. 
Just watch the you tube video tutorial.And you can decorate the outside with some extra's like the bunny's or butterflies from Lisa Horton.


 My live video tutorial on youtube can be found thru the link below:

                                                            https://www.youtube.com/watch?v=syJC5-HlunA


                     Downloadable Template for the Easter Egg Window Box designed by. Natasja Boseker


                                                                                                                               Feel free to comment beneath and follow my facebook, instagram, youtube etc.
                                                                                                                       These all can be found on google just type @bobomadeby and i can be found on all media.


Blogger     https://bobomadebyart.blogspot.com/        


Friday, 20 March 2020

Butterflies make me smile.

Morning everyone.
This morning I would like to share with you a card I have made for Lisa's upcoming show on Wednesday 25th March at 10:30.

My card features the fabulous Daisy Burst Stamps and Die set as well as the Butterfly flourish stamps and die set.

In order to make this card I firstly masked off a section so that I could stamp my Daisy Burst stamps in two colour ways, Wilted Violet and Storm Grey Distress Oxide inks and using two sizes of the stamps.  Then once the ink was dry I masked off the part where I had stamped and made a narrow band either side of my stamping and added Wilted Violet and then moved my masking to make a second band to add Storm Grey on the outside of the Wilted Violet.

Next I masked off the whole section of stamping and stamped the Daisy Burst large stamp on either side of the first lot of stamping, again using Storm Grey.

Now, I don't know about you but sometimes when I am stamping I have a tendency to get ink where it shouldn't be or my stamping isn't as good as it could be!  So, what to do?
Well, this is where the butterflies come in.
Now I could tell you that I planned the placement of the sentiment and the butterflies but that would be a big fat fib! Lol
No, the nested flag die has been added where my stamping didn't quite work properly and I added the Smile sentiment which comes with the Butterfly Flourish Stamp set and added three of Lisa's fabulous shimmery pearls in the bottom left corner for a bit of detail.

The other butterflies are also covering little mishaps, even the little teeny weeny one in the top left hand corner.

So, when you have little happy accidents, because us crafters don' make mistakes lol, you can always just add a butterfly!

So there you go then, a quick masked butterly and daisy card.

Remember to tune in next Wednesday 25th March at 10:15 to see not only the stamps and dies I have used here but also some fabulous new goodies too.

You will now be catching our Design Team sneek peaks of the new products if you are a member of our facebook group Crafting with Lisa Horton
If you are not already a member then please just click the Join button, answer the questions (nothing heavy honest) and then you're in.
Hope to see you there.
We also have a monthly challenge running too, so why not join in with that once you have joined?
There are also Lisa Horton Crafts boards on Pinterest and some of the DT have You Tube channels with demos on too.  So plenty of options to see what others have done with Lisa's fabulous products.

Right, best get on.
TTFN