Showing posts with label tutorial. Show all posts

Thursday, 18 June 2020

MANDALA CARD


    Welcome to my blogpost for Lisa Horton Crafts

This time I made a card with the lovely mandala Stencil. Enjoy this tutorial, and at the end of the tutorial I have a video link where you can see it in speed on You Tube how I made this card.


At first I made two of the same cards with the mandala stencil. I used the following distress ink's: Picked raspberry and worn lipstick. I used a blending tool to apply the ink.


So now I have two of almost the same cards.


In the next step I divide one of the cards in 2cm peices.


I take the strips alternately, and place them on the card on the same spot as the background stencil so it matches. And stick them on with foam tape or you coud also use 3d glue.


After that I splattered some dylusions ink over the card and I cut out a bold word from the new bold wordage stamps (aren't they wonderful).


This is what it looks like up close.


And I weaved through a peice of net curtains that I had as a leftover , and I made a little bow with it.

And voila here is the finished card.


I have also a video tutorial below here, so you can see how I made this card.


And below here I have the same card in a different colour.


Thank you for visiting my blogpost. I hope you enjoyed my tutorial.
watch for more inspiration on  Crafting with Lisa Horton. There are a lot of projects over there from me and my other lovely DT members.
A comment on what you think of my blogpost would be kind, but it's not required.

All products can be bought at That Craft Place Ltd


I wish you a lovely day and if you decide to make something similar feel free to share the photo's of your project on the facebook group or instagram and tag me @bobomadeby


Monday, 4 May 2020

The lovely butterfy

The lovely butterfly

Today i will show you how i made this card with the lovely butterfly stamp on a gelli plate.

I used the following products from Lisa Horton:


- 


At first i used the distress oxide stamp pad, and coverd the gelli plate with the ink.


Next i rolled over the gelli plate to cover the ink over the whole plate.


Then i used the lovely butterfly from Lisa and stamped it with two other distress oxide paints.


Then i stamped the stamp carefully on the gelli plate. To create an impession of the coloured butterfly on the plate.


The stamp imprint you can put that on a blanc peice of paper.


Then take a white peice of paper and lay that on the gelli plate. Carefully rub it and pull it of the plate. And thats your background with the butterfly.


Next i cut out the stamped image from the butterfly.


Now i took some glue and put some lovely white mermaid tails on the butterfly and let that dry.


In meanwhile stick the background on to a black peice of paper, that should be slightly bigger than the background paper. And that together i put that on a slightly bigger piece of white cardstock.


Then glue the butterfly its body on the body of the butterfly from the background card.


Then stamp the background with the texture stamp to add some depth to the card.


As last decorate the card with some pearls and you can add a sentiment to it. And voila a lovely butterfly card is created.


Thank you for visiting our blog and reading my blogpost. Please leave a comment if you like it.

And don't forget to join this months challenge. And join our facebook group https://www.facebook.com/groups/468312444069507/


Blogger               https://bobomadebyart.blogspot.com/


Monday, 27 April 2020

Colourful Art Journal

Hey everyone!
Today, I have for you a bright and colourful art journal.


Not my usual thing - either art journals or bright colours - but it kind of just happened and I think the outcome is pretty cool.

Here's what I did:


Start by gluing on some of the sentiments and various tissue papers for the first layer on the background.


Once I was happy with the 'stickers', I added some paint and wiped out excess through my stencils 
(here, I used Groovy and Mosaic).


When the stencilled paint dried, I added little splodges of paint all over and smeared them out with my fingers - I kept adding and drying until I was happy with the result.


Next, I used the Creative Words stencil to add black pen wording over the colourful background.


The final step was to lighten up the page with white spots using white chalk paint and Bubblewrap stencil. I also added a few more phrases from the Wordage Sheets and outlines a quick frame with black pen.


Here are some close-ups of the page:


See you next time!


Sunday, 12 April 2020

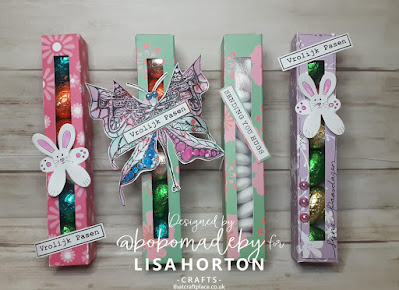
HAPPY EASTER EGG BOX

HAPPY EASTER

Hello everyone I wish you a happy easter. This is my blogpost for this month and i made a little box for easter eggs.


 At first you can print the template that i placed below at the blog.


When it is printed on a carstock paper or if your printer does not print thick paper just print it on printer paper and glue it on the back of a nice paper of choice.


The next step is to cut it nicely, and only cut the outer lines.


Then you score the lines of the box


Cut the peice out, this should be a window.


Glue the box and wait untill it has dried.


Then glue one side of the box at the end and the other one you will 
leave that open so you can add the eggs or candy,
 what you like and.
close that side with a peice of tape.


The Easter Bunny's


these are made with the lovely Daisy burst dies from Lisa.

Here is How to make them.

At first you cut out the largest Daisy Burst flower.


Then you have to fold the two middle pettals to the back, and then fold them in half back again.
That will be the paws.


Then take a fine tip liner and draw the inner peice of the ears, the little face and paws.
Colour the inner ear and the paws pink. And voila you have a cute little bunny to put on this easter box.

If you want to see how i did it watch the youtube tutorial and there it will be shown how to maken them.

And you can also take the lovely butterflies colour them take one of lisa her phrases or words from 
the word pad or ticker phrase stamps and make it a little candy box for a birthday.


And Voila you have a nice box for easter eggs or if you want to use it for candy, you can add a peice of plastic on the inside of the window. 
Just watch the you tube video tutorial.And you can decorate the outside with some extra's like the bunny's or butterflies from Lisa Horton.


 My live video tutorial on youtube can be found thru the link below:

                                                            https://www.youtube.com/watch?v=syJC5-HlunA


                     Downloadable Template for the Easter Egg Window Box designed by. Natasja Boseker


                                                                                                                               Feel free to comment beneath and follow my facebook, instagram, youtube etc.
                                                                                                                       These all can be found on google just type @bobomadeby and i can be found on all media.


Blogger     https://bobomadebyart.blogspot.com/        


Friday, 13 March 2020

How to make a MDF book - romantic hard cover journal

Hey everyone!
I wanted to share with you my latest MDF book.
I don't usually make romantic, pastel projects but this one just kind of happened.


Let's start by making the book...


Glue the book covers and spine on your chosen paper - it's vital that you leave 0.5 cm in between the covers and the spine.


Trim any spare paper around the edges but make sure you leave at least 0.5 cm for wrapping over.


Cut out the corners as above to allow for neat wrapping.


Now, it's time to start wrapping over the paper. 
Make sure you're using a strong double-sided tape for this!
Start from the short edges.


Then the long edge.


Now your outside cover is ready.


For the inside cover, you need to cut a rectangular piece of paper and simply glue it in place.
Make the rectangle minimally smaller than the cover itself.


Delicately fold the cover to create the crease between the covers and the spine.


You're ready to start decorating!


Using Retro Petals stencil and two colour-coordinating inks, add a design creating background for the embellishment cluster.


Build up layers using lace, paper embellishments and flowers.


Keep adding until you're happy.


I decided to make a matching journal insert for the book.


With the same colours as the cover, I added the stencil design.


Then built up the embellishment cluster.


Time to add the insert to the book.


Make a loop from a lace - make sure it's big enough to fit the cover through it.


Making sure you don't damage it, slide the cover and the journal through the lace ribbon - you might want to do it through the back cover rather than the front one.


The lace ribbon will keep the journal in place.


You can add more inserts the same way.


As you can see, the MDF covers are extremely versatile, so make sure you grab some from the shop and make your own books!!!