Showing posts with label #stencil. Show all posts

Sunday, 14 June 2020

Christmas Shadow Box

Hello everyone.
Dawn here with you today.
Did you all watch Lisa's fabulous shows on Friday?
I hope you managed to grab some time to watch and maybe place a cheeky order!

Today I want to show you my little Christmas Shadow Box I made for the show.

The shadow box is one I had from the fabulous Danny McIntosh ages ago now and it has sat in my craft stash ever since.

So, what better way to use it than to decorate it with Lisa's fabulous products.

To begin with I painted the whole of the box frame with Metallic Copper acrylic paint.  Then, using the crackle stamp I stamped all over the front of the frame in black ink.

It looked nice but I decided I wanted it to look a bit "aged" so I used some Stamperia Antique wax in Metallic Gold, Metallic Black and Metallic Turquoise and used an old cloth to wipe it over the front of the frame in different places.

For the inside of the frame I painted it with Paper Artsy Fresco Finish Acrylic Paint in Cheesecake and then using the Medieval stencil from Lisa Horton Crafts went over that with the same Metallic Copper Acrylic paint to give me a fancy background.

Now I wanted the flowers to be 3D in nature but I knew that 3d glue gel wouldn't give me enough height.  So I cut up some pieces of polystyrene and stacked them to give me the height.  

Then in order for the flowers to be at different heights I attached wires to the back and stuck them in the polystyrene so it couldn't be seen.

Then I used one of the new Christmas wordage sheets and used one of my copics to add a colour that matched my project.  

Finally, I found some little bells in my stash so I added some of those to a piece of thread and strung them across the opening, so it now jingles each time you move it. Very festive.


All of the Christmas products I have used on this project are available exclusively at Create and Craft for the next two weeks and thereafter will be available at That Craft Place.

Remember to join in with the monthly challenge the theme for which is "Sets of Three"

Please consider subscribing to our You Tube channel - Lisa Horton Crafts and remember to check out our Pinterest boards.

Lisa will be back on our screens on Tuesday 30th June with some more fabulous new goodies but I will remind you all again in good time.
So, enjoy the rest of your Sunday good people of blogland/craftland and I will see you all again soon

hugs
Dawn
Thursday, 11 June 2020

Christmas In June

Lisa Horton Crafts - Christmas in June

Hi everyone, Jane here!

We’ve almost reached that time again, and I know Lisa and the design team are so excited for her next live shows on Create and Craft.
The live shows can be found online here, or watch on the following:-
Sky channel 683
Freeview channel 95
Virgin channel 748
Freesat channel 813
Apple Tv
Amazon Fire
I tend to watch online on my tablet while crafting 😉

The Christmas shows have already started and tomorrow it’s our Lisa’s turn, and she will be bringing you a huge range of seasonal goodies to get you into the Christmas mood.

We have MDF advent calendars, paper pads, stamps, more mermaid tails and sooooo much more, so be sure to tune in at either 7:30 am or 11:15 am or even better, catch both shows for demos and ideas.
The full range from Lisa Horton Crafts can be found here.
Don’t worry, if you miss both shows, they can be watched online on catch up. Also keep an eye on our group where links to the catch up shows will be posted.
Lisa will have some amazing demonstrations lined up, and I think I speak for the entire design team when I say, we’re all buzzing with excitement.
Two weeks after the live shows on Create and Craft, you will be able to go shopping here if you prefer.

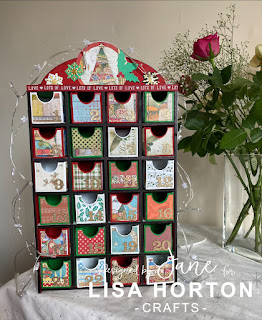
I had so much fun building and decorating my advent calendar. I used traditional colours and the Make A Wish Christmas papers from Stamperia.

You can find more ideas for Christmas from the DT on our Pinterest board here

If you’re looking for some tips on how to use your LHC stash, you can find it all over our social media channels, all of these are listed below:-
And you can always follow all the design team on Instagram by searching #lisahortoncraftsdt where you will find all of our fabulous projects.
Take care and lots of love
Jane xoxo

Friday, 29 May 2020

Sunshine Tag

Sunflower Tag by Jane Robinson


Hey there!
Welcome back to our blog.
I’m Jane, and have recently joined the Design Team for Lisa Horton, and I’m here today to hopefully inspire you to try this project or something similar. Give it a go, then post in our group, and perhaps tag me with your amazing creation.
This quick and easy project will have you exploring your creativity in no time. Most of the products I used are from Lisa Horton Crafts, and can be found here


I started off by looking in my stash for a tag like base. I came across
some oval shaped card. I suddenly remembered; I’d saved these after buying some new socks. I’d bought some of those little trainer socks from Primark, and the socks were displayed over them. I kept them thinking they would come in useful someday.
Well… someday arrived, and I quickly dug out my stencils, acrylic paints, and other crafty goodies.

First step:
I laid a base coat of white gesso, even though the tags were originally white, they had a shiny surface. I need any medium I use to adhere well, so gesso is definitely the way to go, as it provides a primed base which will take anything your crafty hands will throw at it.
I used my heat tool, on the number one setting to dry.

Step two:
I used Lisa’s ‘Pennies In A Line’ stencil and Decoart Marigold Acrylic paint to create the background. The paint was applied sparingly, using a make-up sponge.

Third step:
I mixed some of Lisa’s Sunshine Mica Pigment Powder with some gritty structure paste, and a drop of ink refill in a summery yellow colour. Then pushed that through LHC ‘Spring Bloom’ stencil.

Step four:
Make a brew while the structure paste dries :D

Step five:
I used a finger dauber to colour the centre of the blooms with a dark brown shade of ink, used the same colour to stamp the script using LHC ‘Textures’ stamp set, and also ink up the edges for a distress look.

Sixth step:
I cut apart one of the white sentiment strips from LHC ‘Wordage Sheets’, coloured it with the same acrylic paint, and adhered using 3D silicone glue.

I finished it off with a brown cord tie.

Thanks for taking a peek today, be kind to each other.
Jane xoxo


Saturday, 16 May 2020

It's our moments of struggle that define us...


Hello again

During these uncertain times, rainbows have been a symbol of hope and strength.  My blog post today is based upon all the vibrant colours of the rainbow and Lisa's stamps namely the "Majestic Butterflies" 

 You will also need:
1 x 5" x 7" card blank
1 x 5" x 7" piece of white card
Lisa Horton Crafts -Majestic Butterflies stamp set
Lisa Horton Crafts - Bubblewrap Stencil
Lisa Horton Crafts - In the Loop DL stamp set (Currently sold out)
Lisa Horton Crafts - black embossing powder
Embossing ink pad
Black Versafine ink pad
Coloured pens
Coloured stamp pads _ I used Distress Oxides
Lisa Horton Crafts - Wordage sentiments

How to create this card:

1.  Using embossing ink and black embossing powder - heat emboss your chosen Majestic butterfly, onto the 5" x 7" piece of white card.  Try and place at a jaunty angle in the centre of the card.


2.    For this particular card you are using the stencil as the main design.  Take the Bubblewrap stencil and place it centrally over the butterfly image. Seal it down carefully so that there is no risk of movement. Gather together your inks which cover all the colours of the rainbow.  I added mine with egg blending tools.


3.  Work from one side of the stencil to the other and add the stripes of the the rainbow.  Blending as you go.


4.  Now, use the same colours to edge the piece of card.  Match the red edge to the same area as marked on the stencil.  Repeat the process for each colour.


5.  To bring back the image of the butterfly - buff it up using a dry piece of kitchen roll.


6.  Now - highlight the areas of the butterfly wings with your chosen colouring pens.  Stick to the bands of colour that have been inked through the stencil.  For example - use a blue pen to colour the parts of the wings that have blue ink on them.  Your aim is to keep the bands of colour intact.


7.  Finish the card by adding two or three additional details, such as the circle stamps from "In the Loop" / coloured sequins and a Wordage sentiment of your choice.


I think a card like this would be perfect to send to a friend in isolation as "It's our moments of struggle that define us"

Alternatively, why not make a card with a butterfly theme to enter into our Facebook Group Challenge.  Full details can be found pinned in the announcements at Crafting with Lisa Horton:  https://www.facebook.com/groups/468312444069507/


Stay safe - stay strong - happy crafting!

Until next time
Elisabeth xx


Tuesday, 7 April 2020

How to make a simple stencilled notebook,


How to make a simple, stencilled notebook

Hello - I am back again with an idea for making a simple notebook using one sheet of A3 paper and a selection of fabulous stencils from Lisa Horton Crafts.


To make this notebook you will need : 
1 sheet of A3 paper (approx 160 gsm) or stick 2 sheets of A4 paper together to make the same.
8 sheets of white stamping card (measuring 4" x 5.5")
Oxide inks or blendable inks of your choice
Black Versafine Clair
Pencils and Pens of your choice
Lisa Horton Crafts Stencils
Lisa Horton Crafts Majestic Butterfly stamps
Lisa Horton Crafts - In the Loops stamps
Ribbon and red line tape


To make this notebook begin by making a "One Sheet Notebook" using the A3 sheet of paper 
Full instructions can be found on my YouTube Channel


Next, take a variety of the Lisa Horton stencils and blend ink through them using the colours of your choice.  I tend to colour up in three areas (using the first colour ) through the stencil.  Re-align the stencil and repeat the process twice more using inks 2 and 3.  Then I look for the gaps and repeat again with stencil 2

Here are the different stencil combinations I used to start you off: 
TARTAN AND SUN BURST 
(the Oxide Inks I used were - Pink Spun Sugar/ Yellow Squeezed Lemonade/ Blue Tumbled Glass)


SUN BURST AND HIVE


MEDIEVAL AND DAISY CHAIN


PENNIES IN LINE - HIVE - HEART FLURRY 


PENNIES IN A LINE AND DAISY CHAIN


Ink up all 8 pieces of paper.  


Adhere 6 of the pieces inside your "One Sheet Notebook".  Save 2 pieces for the covers of your Notebook.


To decorate the covers of your Notebook.  Stamp two butterflies of your choice onto a sheet of paper I used pale yellow).  You can also stamp the same butterfly directly onto your stencilled papers but this is not strictly necessary.


Cut out the stamps on the extra piece of paper.  With pencils and pens, enjoy colouring in the stunning stamps that Anne Ruffles has designed.  Stick the two butterflies onto the stencilled background.  I used sticky pads (to add depth) to the centre of the butterfly - showing the stamped butterfly underneath. I also added a few of the circles from Lisa's In the Loop stamps plus a few of my own squiggles and.sequins.


Add red liner tape to the central horizontal line in order that you can secure the ribbon.  


You will hide the workings underneath the stencilled front cover.


Your Notebook can now be written in directly or maybe you could add a few tags and send it to a friend to write lists in.  Alternatively you could add pockets and insert mini cards and envelopes to send to your family.  The Notebook is so versatile you could adapt it in many ways.


As you can see - the combination of Lisa's stencils and stamps will allow you to make a creative, beautiful piece of artwork.  It is really up to your imagination.


I hope you will give this project a go and please do share your creations with us on our Facebook Group - Crafting with Lisa Horton.

If you need further inspiration then why not check out our Pinterest Pages too

Until next time.  Happy crafting
Love - Elisabeth x


Tuesday, 31 March 2020

CAS Card Using Stencils

Hello Crafty Friends!

Fairuz Fabiha here from the Craftivation. Today I’ll be sharing with you how I made a clean and simple card using the Medieval stencil that Lisa will be releasing soon.

Step by step process-
1. Firstly, I took a white cardstock for the base of my card.

2. Then I masked the card diagonally, exposing the middle portion and applied & blended 3 shades of blue ink through the amazing Medieval stencil by Lisa Horton Crafts.

3. I then added two strips of silver mirror paper to border the stenciled portion of the card.

4. Added a sentiment strip from the wordage sentiment pad by Lisa.

5. Finally, finished off the card by adding some crystal embellishments.

Closeup photos-


Used Lisa Horton Crafts Products-

1. Medieval Stencil
2. Wordpad Sentiments

Thanks so much for visiting the blog. To see and fill your craft stash with more exciting products from Lisa, do keep an eye on the Create and Craft show on 3rd April.
You can also find some awesome inspirations from our design team by visiting the Facebook group for Lisa Horton Crafts Lovers, named CRAFTING WITH LISA HORTON .

Love,
Fairuz Fabiha (CRAFTIVATION). xx

Friday, 13 March 2020

How to make a MDF book - romantic hard cover journal

Hey everyone!
I wanted to share with you my latest MDF book.
I don't usually make romantic, pastel projects but this one just kind of happened.


Let's start by making the book...


Glue the book covers and spine on your chosen paper - it's vital that you leave 0.5 cm in between the covers and the spine.


Trim any spare paper around the edges but make sure you leave at least 0.5 cm for wrapping over.


Cut out the corners as above to allow for neat wrapping.


Now, it's time to start wrapping over the paper. 
Make sure you're using a strong double-sided tape for this!
Start from the short edges.


Then the long edge.


Now your outside cover is ready.


For the inside cover, you need to cut a rectangular piece of paper and simply glue it in place.
Make the rectangle minimally smaller than the cover itself.


Delicately fold the cover to create the crease between the covers and the spine.


You're ready to start decorating!


Using Retro Petals stencil and two colour-coordinating inks, add a design creating background for the embellishment cluster.


Build up layers using lace, paper embellishments and flowers.


Keep adding until you're happy.


I decided to make a matching journal insert for the book.


With the same colours as the cover, I added the stencil design.


Then built up the embellishment cluster.


Time to add the insert to the book.


Make a loop from a lace - make sure it's big enough to fit the cover through it.


Making sure you don't damage it, slide the cover and the journal through the lace ribbon - you might want to do it through the back cover rather than the front one.


The lace ribbon will keep the journal in place.


You can add more inserts the same way.


As you can see, the MDF covers are extremely versatile, so make sure you grab some from the shop and make your own books!!!