Sunday, 28 June 2020

Let it snow, Let it snow, Let it snow!

Hi all,

Miriam with you again today.

I am sure you caught Lisa's launch of her Christmas collection - isn't it amazing!  My wish list is huge!

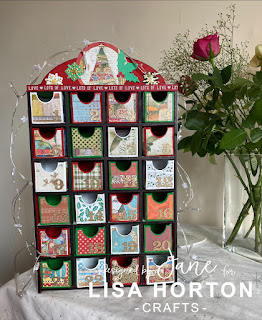
Here is the advent calendar that I decorated:


I love the kits from That Craft Place .  The designs are amazing and they are so easy to put together.  I don't think I have ever needed instructions.


The new stamp collections are so so useful.  You can use bits of them or loads of them - They are going to be brilliant for my Christmas cards this year.


I created a crackle effect over my advent calendar and even added one of the wonderful bottles to the back.  

This stamp, I know, will be used for years to come!  The possibilities are endless.

So, there you have it, the advent calendar I created for Lisa's show.  I even filled it with chocolates!

Thank you for joining me today.

Happy crafting!
Miriam

Thursday, 18 June 2020

MANDALA CARD


    Welcome to my blogpost for Lisa Horton Crafts

This time I made a card with the lovely mandala Stencil. Enjoy this tutorial, and at the end of the tutorial I have a video link where you can see it in speed on You Tube how I made this card.


At first I made two of the same cards with the mandala stencil. I used the following distress ink's: Picked raspberry and worn lipstick. I used a blending tool to apply the ink.


So now I have two of almost the same cards.


In the next step I divide one of the cards in 2cm peices.


I take the strips alternately, and place them on the card on the same spot as the background stencil so it matches. And stick them on with foam tape or you coud also use 3d glue.


After that I splattered some dylusions ink over the card and I cut out a bold word from the new bold wordage stamps (aren't they wonderful).


This is what it looks like up close.


And I weaved through a peice of net curtains that I had as a leftover , and I made a little bow with it.

And voila here is the finished card.


I have also a video tutorial below here, so you can see how I made this card.


And below here I have the same card in a different colour.


Thank you for visiting my blogpost. I hope you enjoyed my tutorial.
watch for more inspiration on  Crafting with Lisa Horton. There are a lot of projects over there from me and my other lovely DT members.
A comment on what you think of my blogpost would be kind, but it's not required.

All products can be bought at That Craft Place Ltd


I wish you a lovely day and if you decide to make something similar feel free to share the photo's of your project on the facebook group or instagram and tag me @bobomadeby


Wednesday, 17 June 2020

Versatility of Mandala stamps and stencils


Hello, and welcome back to the Lisa Horton Craft blog, Claire Newcombe with you today.

Today I'm sharing with you my projects from each of my FB live events throughout the month of June so, plus the first look at a card scheduled for 23rd June.
Each of the projects in the photo above have been made with the June challenge theme in mind, and will be sent to the winner of June challenge which is 'SETS of THREE'

The theme can be interpreted in any way you choose, whether it be adding three elements on your project, or maybe making three ATC's, a set of three co-ordinating projects....your choice, have some fun with it.


There is another way in which all the projects made are linked, and that is that they all feature the fabulous Mandala collection of stamps and stencils....all of which are now available from Lisa's website

I wanted to create a selection of very different projects, demonstrating just how versatile the Mandala designs can be and how well they slot into Lisa's whole repertoire of products.

ALL FB LIVES FROM DESIGN MEMBERS CAN BE FOUND ON OUR NEW YOUTUBE CHANNEL, FOLLOW THE LINK TO SUBSCRIBE

I have attached the Youtube links for the projects that I have already created, if you would like to make them yourself.

1. Facebook Live 2nd June (YouTube https://www.youtube.com/watch?v=QeED11ESUOo)
I have created a set of three ATC's (artist trading cards) in a very feminine style. The mandala stencils feature in the background as a beautiful backdrop for the A5 Foliage stamps.
You will see on the middle card the mandala pattern has been clear embossed as a design feature. 


----------------------------

2. Facebook live 9th June (YouTube https://www.youtube.com/watch?v=qBKU7Y0AhGE&t=498s)
These cards show the beauty of the Mandala stamps themselves, and the fun you can have colouring them.
But also how they can be used to create subtle backgrounds, when stamped with clear embossing ink onto coloured card for a tone on tone effect.


------------------------------

3. Facebook live 16th June (YouTube https://youtu.be/2XeqCWhlb2Q)
The mandala stencils are layered here in the background with Lisa Hortons Woodgrain background stamp, and Mandala stamps highlighted with mica powder.
It is important to show that all products released into the Lisa Horton range will be able to mix and match with each other.


----------------------

4. Facebook live scheduled for 23rd June
This project uses the mandala stencils in a more familiar way, layered up to show their beauty. I have used the circle stencils with. distress ink to create a background. The  'grungy' details have been added using Lisa's A6 Texture stamps.
I hope you can join me next week when i demo this on a FB live 


Thank you so much for stopping by, I hope this has made you smile today.
Remember we have a lovely Facebook group where we'd love for you to share all your makes with Lisa products, I'll pop the link just here


Take care of yourselves x

Monday, 15 June 2020

Poinsettias

Hello everyone.

Sharing a Christmas card with poinsettias flowers from Lisa's new Christmas stamps.


The card is measuring slightly smaller then A5 size card.
Christmas Flowers artwork stamps,
Stencil coming soon,
Stitched scalloped circles dies,
Black  micro glitter,
Sticky sheets,
Pearls 
Markers to colour the image.

I embossed white A5 size card using a stencil, then cut at both ends 1.5 cm at the top and bottom of  embossed card. Using sticky sheets on black card I applied black micro glitter and cut to strips. Glued the strips to both ends of embossed card and then glued to the base card. 
I used sticky sheets on black card and cut a circle using two circle dies, the I applied black glitter to the circle frame and glued to the center of card.
Coloured the poinsettias flowers with alcohol markers, fussy cut out and shaped the flowers before gluing them to the card.
Cut out the sentiments and framed them with black card, added to the card with foam pads for dimensions.
Added little yellow pearls to the center of poinsettias and some corner of the card.


Most of Lisa Horton crafts products you can find on That Craft Place
If you can't find them on Lisa's website then please try Create and Craft

Hope you are all well and staying safe.

Thank you for looking and leaving your comments.
Have a wonderful day and happy crafting.
Hugs Natalia.

Sunday, 14 June 2020

Christmas Shadow Box

Hello everyone.
Dawn here with you today.
Did you all watch Lisa's fabulous shows on Friday?
I hope you managed to grab some time to watch and maybe place a cheeky order!

Today I want to show you my little Christmas Shadow Box I made for the show.

The shadow box is one I had from the fabulous Danny McIntosh ages ago now and it has sat in my craft stash ever since.

So, what better way to use it than to decorate it with Lisa's fabulous products.

To begin with I painted the whole of the box frame with Metallic Copper acrylic paint.  Then, using the crackle stamp I stamped all over the front of the frame in black ink.

It looked nice but I decided I wanted it to look a bit "aged" so I used some Stamperia Antique wax in Metallic Gold, Metallic Black and Metallic Turquoise and used an old cloth to wipe it over the front of the frame in different places.

For the inside of the frame I painted it with Paper Artsy Fresco Finish Acrylic Paint in Cheesecake and then using the Medieval stencil from Lisa Horton Crafts went over that with the same Metallic Copper Acrylic paint to give me a fancy background.

Now I wanted the flowers to be 3D in nature but I knew that 3d glue gel wouldn't give me enough height.  So I cut up some pieces of polystyrene and stacked them to give me the height.  

Then in order for the flowers to be at different heights I attached wires to the back and stuck them in the polystyrene so it couldn't be seen.

Then I used one of the new Christmas wordage sheets and used one of my copics to add a colour that matched my project.  

Finally, I found some little bells in my stash so I added some of those to a piece of thread and strung them across the opening, so it now jingles each time you move it. Very festive.


All of the Christmas products I have used on this project are available exclusively at Create and Craft for the next two weeks and thereafter will be available at That Craft Place.

Remember to join in with the monthly challenge the theme for which is "Sets of Three"

Please consider subscribing to our You Tube channel - Lisa Horton Crafts and remember to check out our Pinterest boards.

Lisa will be back on our screens on Tuesday 30th June with some more fabulous new goodies but I will remind you all again in good time.
So, enjoy the rest of your Sunday good people of blogland/craftland and I will see you all again soon

hugs
Dawn

Friday, 12 June 2020

Marvellous Mandala

Good morning all, hope you’re all keeping safe and well this June morning.
C:\Users\user\Pictures\2020 Samples\Lisa Horton\97376074_3178244122206845_5766861169683857408_n (2).jpg

I have created a card using the fantastic Create Beautiful Things stamp set for this blog post along with ultra-fine interference glitter and pastel pearls.
I stamped the half mandala onto the left and right edges of a 13cm x 13cm piece of white smooth stamping card and coloured with alcohol markers in shades of pink, turquoise and green but obviously you could use pencils or paints or your own choice of colours. This can then be attached to a piece of 14cm x 14cm so-ordinating background card and then onto the front of a 15cm x 15cm blank white card.
C:\Users\user\Pictures\2020 Samples\Lisa Horton\97376074_3178244122206845_5766861169683857408_n (3).jpg


Stamp the medium sized mandala onto a piece of smooth white stamping card, colour and carefully cut out. Apply glue with a glue pen to some areas of the mandala ( in the small sample above you will see I have added the glue to the pale pink areas) and sprinkle with glitter, tap off the excess and leave to dry before attaching centrally to the front of the card with 3d foam pads or silicone glue. Attach a large pearl to the centre.
Finally stamp the ‘just for you’ and ‘with love’ sentiments above and below the central mandala.
Happy crafting

Sue xx

Thursday, 11 June 2020

Christmas In June

Lisa Horton Crafts - Christmas in June

Hi everyone, Jane here!

We’ve almost reached that time again, and I know Lisa and the design team are so excited for her next live shows on Create and Craft.
The live shows can be found online here, or watch on the following:-
Sky channel 683
Freeview channel 95
Virgin channel 748
Freesat channel 813
Apple Tv
Amazon Fire
I tend to watch online on my tablet while crafting 😉

The Christmas shows have already started and tomorrow it’s our Lisa’s turn, and she will be bringing you a huge range of seasonal goodies to get you into the Christmas mood.

We have MDF advent calendars, paper pads, stamps, more mermaid tails and sooooo much more, so be sure to tune in at either 7:30 am or 11:15 am or even better, catch both shows for demos and ideas.
The full range from Lisa Horton Crafts can be found here.
Don’t worry, if you miss both shows, they can be watched online on catch up. Also keep an eye on our group where links to the catch up shows will be posted.
Lisa will have some amazing demonstrations lined up, and I think I speak for the entire design team when I say, we’re all buzzing with excitement.
Two weeks after the live shows on Create and Craft, you will be able to go shopping here if you prefer.

I had so much fun building and decorating my advent calendar. I used traditional colours and the Make A Wish Christmas papers from Stamperia.

You can find more ideas for Christmas from the DT on our Pinterest board here

If you’re looking for some tips on how to use your LHC stash, you can find it all over our social media channels, all of these are listed below:-
And you can always follow all the design team on Instagram by searching #lisahortoncraftsdt where you will find all of our fabulous projects.
Take care and lots of love
Jane xoxo

Wednesday, 10 June 2020

Edgecutz Mini Album by Paul


Hello all. It’s me, Paul, back with you today. 
For those that follow me online, you’ll know I love dies and mini books so here I combined the two crafting joys in one. I have used the Butterfly Flourish as my inspiration for this album. 

The edger was used for pockets and I used the large butterfly for the tab lifts. If you want to see this album in action, I have filmed a walkthrough. If you want to make one, I filmed a tutorial. You can find it all here:


Monday, 8 June 2020

Summer Showstopper


Hello again.  
Elisabeth here with a bright, beautiful showstopper of a card!  

To make a Mandala Tuxedo Card

You will need:

Lisa Horton Crafts - Choose Happy Mandala Stamp set
Lisa Horton Crafts - pearl embellishments
Lisa Horton Crafts - Natural Sisal
I sheet of White cardstock - approx 160gsm
2 sheets of colour cardstock - I used two shades of yellow
Black waterproof ink - I used Versafine Clair (Nocturne)
Red liner tape.
Wet glue
Sticky pads


How to create this Summer Showstopper Tuxedo card:

1.  Use the template below to create the tuxedo base card.  If you need detailed instructions then take a look at my blog post from last year,


2.  Stamp out nine medium sized mandalas and nine smaller sized mandalas.  In this version I matched a bold yellow, medium sized mandala with a light yellow, small sized mandala - and vice versa.  Stamp out your chosen sentiments too.


3.  Once cut out, adhere a small sticky pad to the centre of every medium sized mandala and layer  the smaller mandala on top.


4.  Embellish each mandala flower with a pearl from Lisa Horton Crafts ever expanding range of colours.  I used a subtle silver pearl to the centre of my mandala flowers.


 5.  Cut several wafer thin strips of card (from the waste of your tuxedo template) and begin sticking the mandala flowers to one end.  You want the flower to feel sturdy so place the strip centrally behind the flower.


6.  Cut 3 strips of white card 1 cm in width and 9cm in length.  Score each strip at 1cm and 8cm along the length.  Fold one end back and the other forward.  These three strips will act as the struts within your tuxedo card.  Glue the tabs to the inside of your box as shown below.


7.  Normally I would decorate the outside of the Tuxedo card before making it into a box and adding the struts.  However, I did not know how I wanted the card to look until I saw the flowers in situ.  Using the spare paper from the stamped images.  Cut the panels for your card as shown.  Then decorate the front panels with the smaller mandala stamp.  The back panels are kept plain - so that a message can be written.  Glue all six panels to the outside of your Tuxedo box.


8.  Attach the flowers from the front strut, building up the height as you go.  I also added Sisal in between the rows to help the struts stay in place.  The Sisal has the added bonus of finishing off the card with a hint of wispiness.  Finally add your chosen sentiments.  

Your Summer Showstopper of a card will lie flat for posting and will pop back up again when the recipient takes it out of the envelope.


I do hope you will enjoy making your own Summer Showstopper card.  Please do share your makes with me on our Facebook Group Page - Crafting with Lisa Horton.


You can also find further inspiration for the whole range of Mandala products on our dedicated Pinterest board


As always, if you have any questions then please comment below and I will be more than happy to help you.

Keep crafting - stay safe and keep well  xx


Sunday, 7 June 2020

Memories / Liz Marsden

Hi guys, It was my Daughter and Son-in-laws 12th Wedding Anniversary at the end of last month, so I made them this Anniversary card,


I took a piece of water colour card and using the Heart flurry stencil I went over it with some crackle paste, let this dry well,
When dry I went over with some Lindy's gang Magicals and sprays randomly adding the colour here and there, again leave to dry,
Then attach the water colour card to some Black card stock for the card base,


Using the same colours I painted the grey board hearts, then stamped over them with one of the background texture stamps to add a little interest, if it looks to strong go over with a light layer of white Gesso to tone it down, fix these on top of some black thread loosely wrapped around your fingers first then adhered down,

Seeing as it was their 12th Anniversary I used one of the awesome MDF number plaques keeping it in it's natural colour, this I glued to one side then I used the 4 point bloom dies to create the flowers, using two of the sizes, cut out of the same water colour card, coloured with the same spray paint, then when dry layered up together alternating the petals, finishing them off with a AB pearl effect embellishment,

I finished off the Focal arrangement with the numbers out of the MDF plaque as shown,

I then finished off the card by stamping randomly a little of the script background stamp here and there too, with one of the just saying ticker Phrases stamps used for the memories which I raised at the back with some 3d foam pad,


 you can buy Lisa's products from Create and Craft TV first, then 2 weeks after the shows from her online shop That Craft Place, if not sold out, Lisa restocks her shop as often as she can, but with Covid things are taking a little longer at the minute,
https://thatcraftplace.co.uk/

Happy Crafting!!!
Hugs Liz xx

Saturday, 6 June 2020

Butterfly Wing Background

Hello Lisa Horton Crafts Friends!!

Happy Saturday!

Kendra here from Luv 2 Scrap n' Make Cards to share a pretty card with you!!

My card today features the lovely Wings and Things stamp set!  I absolutely LOVE this set!  The detail on the butterfly wings is so beautiful!

Instead of creating a butterfly with the set, I decided to use one of the wings to create a fun background:
I love how it turned out!  The stamped wings look so pretty on Lisa's paper!! I used a piece of paper from the Capri Paper Pad!!  Such beautiful paper!!

Here is a look at my stamping process:
 I slightly lined up the 'wing' so that it would touch the previously stamped wing.  I like how the design then looks like it is all connected!

It creates such a fun background, in my opinion!!

As I am writing this post I'm thinking, I absolutely love stamping on Lisa's beautiful paper, but image stamping these wings on a piece of white paper and then coloring the wings in with bright colors to create a fun bright and colorful background! 

A close-up:
  I used the Just Saying - Be Happy stamp set for my sentiment.  I love the font used on these sentiments!!

The added little die cut butterfly is from the the Butterfly Flourish Die Set!

Another fun use for the wing stamps!

Have a lovely day!