Showing posts with label #nestedflagdies. Show all posts

Wednesday, 29 April 2020

Mermaid, Mica, Paste and Pearls!

Good morning everyone.
I hope you are all well and staying safe during this weird time we are currently experiencing.

Honestly I thought this lockdown thing would give me oodles of time to craft but I really don't know where my hours go to each day.  We don't stay in bed late but the days seem to just rush by and before I know it, the weekend is upon us once again.
Gosh at this rate it will soon be.................  NO!  I am not going there! Lol

Anyway, did my blog post title intrigue you a little?
I wanted to show you a little project I did using all of the items in the title.
This did start out as a card to be sent in for the Design Team work for the last show but my texture paste didn't dry quickly enough so I set it aside to use another day, and here we are!

To give the texture paste a bit of interest I added in some of the interference mica powder that Lisa introduced recently.  I think I used the purple one, mind you it never looks like I expect it to. Lol

So once I had added the mica to the paste I dragged the paste through the bubblewrap stencil, one of my favourites.  Then set it aside to dry.  Now you can dry it with your heat gun but sometimes it bubbles if you get too close so my preference would always be to air dry it.

Next I went around the edge of the card with a sponge and some Distress Oxide ink in Spun Sugar.

Using Lisa's Four Point Blooms die set I cut out some flowers using the Bali paper pad.

Now I have to be honest here, I have TOTALLY pinched this idea from Claire Newcombe because I thought it just looked A-MAZ-ING!  
I cut two of the nested flag dies and added the white (not white, lol) Mermaid Tails glitter to the smaller one and layered that up on to the next size up.  Again I went around the edge of the larger one with Spun Sugar Distress Oxide.

I added some of the Gorgeous Sisal behind the flowers and of course I just HAD to use the fabulous new Cool Skies pearls for the centre of my flowers.  The finishing touch was one of the little phrases from the Wordage sheets.  I cannot tell you how useful these are. 😃😃
See how the texture paste looks different colours from different angles?  That's what the interference mica powders do.  Cool eh?
The eagle eyed amongst you will notice that the flower in the middle does not have as many layers as the other two.  Well, that's because I got cocky and decide to cut my flowers without taping them down to the paper.  Not only did they move and not cut all of them, I have also dented one of the flower dies as the little leaf die moved underneath it!! Be warned - secure your dies if you want to make the most of both them and the paper you are using!! 😱😱😱

So folks, there you have it -
Mermaid, Mica, Paste and Pearls!
Hope you like the project.

Remember all the products I have used will be available at Lisa's website - www.thatcraftplace.co.uk  
Lisa will be back on your screens on 7 May with some GAWJUSS new stuff - honestly, it is to die for.

Don't forget to visit our Facebook group Crafting with Lisa Horton and there are oodles of samples on our Pinterest pages too.

Happy Crafting! 
xxx

Sunday, 19 April 2020

All We Need Is A Little Sunshine

Hello Crafty Friends!
Fairuz Fabiha here from the Craftivation. Today I’ll be sharing with you a simple card I made using some of the amazing products from Lisa’s collection.


Used Supplies-
1. Medieval Stencil
2. Nested Flag Dies
3. Wordage Sentiment
4. Sisal
5. Greyboard Heart Embellishment

You can check out the That Craft Place/ Lisa Horton Crafts Website to get your hands on some of these gorgeous products.

Closeup photos-


To create this card, I chose jet black cardstock as the card base. Then cut out a cool grey panel using Lisa’s nested flag dies and did some stenciling using Lisa Horton Crafts Medieval stencil & distress ink (shades- shaded lilac & chipped sapphire). After attaching the panel on the card base, I added a greyboard heart embellishment stenciled with the same medieval stencil and colored in black in the center and topped it with two bright yellow paper flowers. To add some more interest, I used some sisal beneath it and some yellow stones as embellishments. Finally finished off the card with the perfect sentiment “All We Need Is A Little Sunshine” from Lisa’s Wordage Sentiments.

Hope you guys liked today’s card. Thanks for visiting the blog. Xx

Love,
Fairuz Fabiha.

Wednesday, 15 April 2020

Easel Card By Tina Foster


Hello everyone, its great to see you're taking a look at my latest blog. Hope you'll enjoy creating this one with me. For this project, I've put together a very simple easel card using the fab new products from Lisa Horton. Of course, by using the lovely banner dies you can create any message and personalise too, making it extra special for the recipient.


Tools 

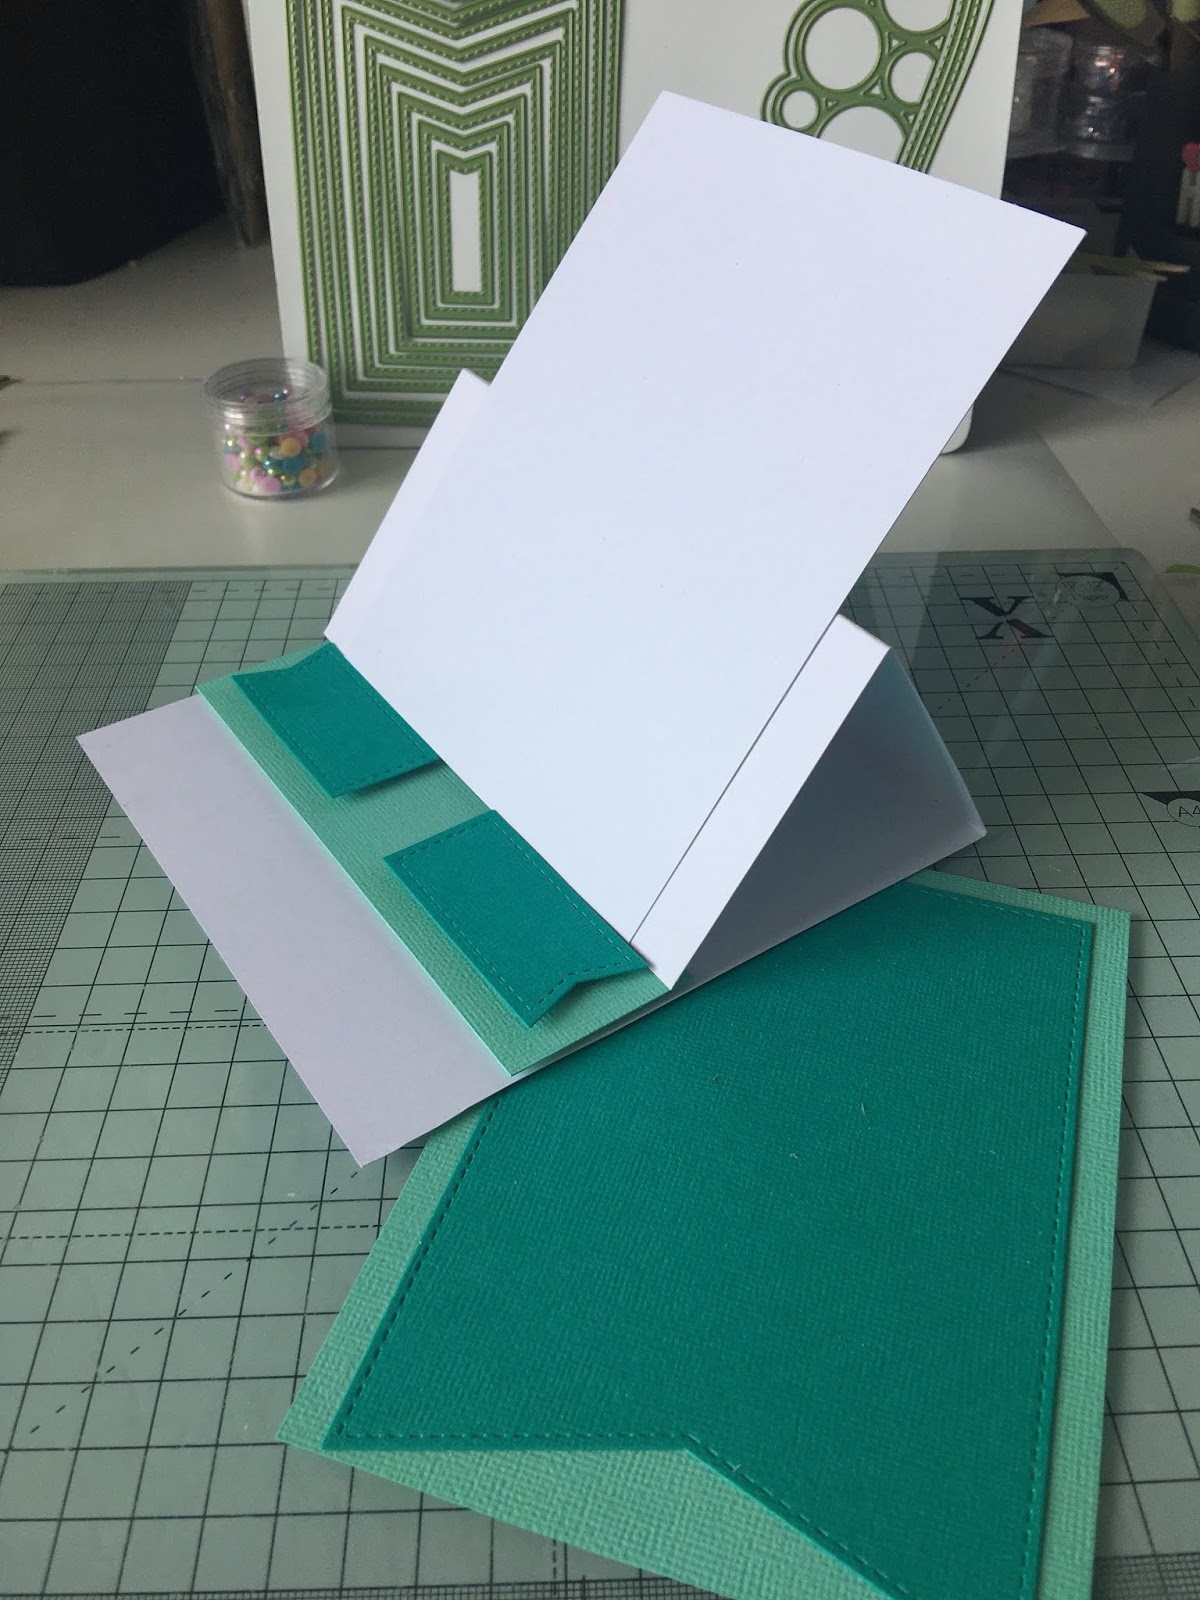
Start by taking (or making) a card blank.  The blanks I'm using measure 15cm x 15cm.  I always use 300gsm cardstock for the base card to make it nice and sturdy. Score down the middle of one half and use a bone folder along the crease to give a nice fold.
Next use the nested flags die set to cut 3 flags in your darker main colour shade. Cut 1 of the largest flags and 2 of the second smallest. Cut the contrasting lighter shade backing a little wider than your large flag (11cm x15cm) and stick onto the back of the flag leaving a border at the sides and top edge only. Now take some more white base card (15cm x 12cm) and stick this to your easel making sure when you lay it flat its the same height as your card. Wait to stick your flag onto this as you'll want to pop the strings of your banner between these layers when you're ready.

For the easel stopper cut a piece of the lighter shade of your colours measuring  15cm x 4cm. Stick it onto your card with foam tape leaving a white space underneath it measuring about 3cm. Add your 2 small flags, again with foam tape.

Next die cut your flower layers, your swirls, leaves and banner letters for your message on the card.
Put your banner together using glue. I always put the string inside the two layers for a neat finish.

Curl the edges of your flower and leaf die cuts with scissors and layer up your flowers with foam tape to add dimension. 
Stick the flowers in your desired position On the card, leaving enough space for your banners. Add your banner(s) securing on the back with 3d foam and pop it on to the easel with an equal margin at each side.  Glue the flourishes to the small banners and use foam tape to secure the remaining flower to the middle of the stopper.

Use a corner rounder to soften the bottom corners, and use Lisa's beautiful new ab pearls for a touch of elegance. And to add a little love to the message, I decided to pop on a couple of little hearts from my stash.

I hope you found this project helpful, and that you enjoyed a little crafting therapy! Until next time, please take care and stay safe x
Tina x

Friday, 3 April 2020

Flag Die Notebooks


 Hi all! Paul here again to share with you a really easy project. Did you manage to get these flag dies? If you did, why not try making a little notebook. They are so easy and so much fun to make.


I started off by tracing the outside of the largest flag onto greyboard, cut it out then repeated so that I had a front and back cover. This gives a cover slightly larger than the pages to when it comes to mat and layer, you get a nice finsih. I dabbed some black gesso around the edges (marker pen would also work I'm sure). Then I cut designer paper to stick onto the outside and inside of each cover.


I then cut a number of pages from white cardstock. I used a cropodile to punch holes in the papers. I used one f the pages as a template on the cover to align the holes (as it is a slightly different size, align it with the paper you stuck onto the greyboard for a perfect match). A couple of book binding rings and ribbon and it's all done.


On my cover, I used the Spring Bloom stencil texture paste to add some dimension.

Wednesday, 1 April 2020

Majestic Butterflies flying in soon!

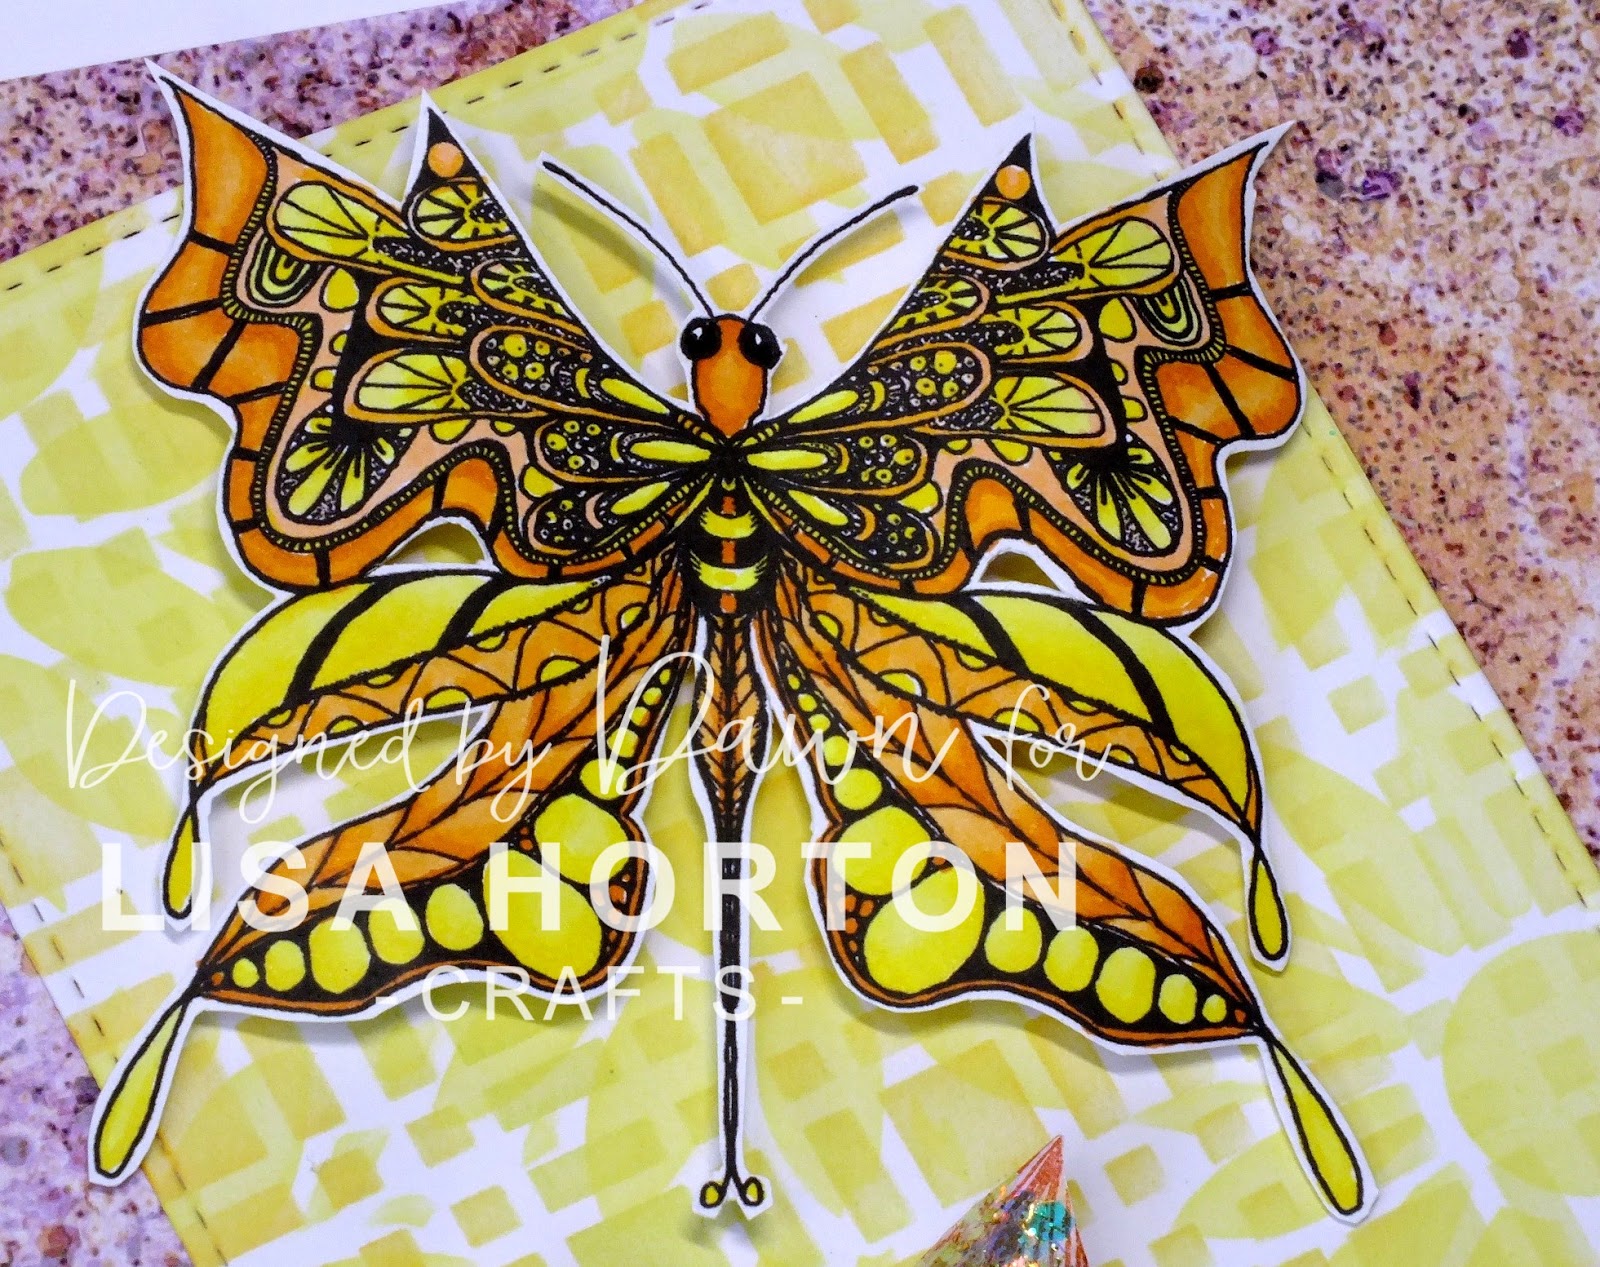
Hi everyone, Dawn here again to give you a quick glimpse of something simply breathtaking coming up on Lisa's next show on Friday 3rd April for the Create and Craft Birthday Bonanza.

As soon as I saw these I just knew I was going to have a colouring frenzy! Lol
This butterfly is from a set called Majestic Butterflies but trust me there is so much more coming up too.  You will be spoilt for choice.

My butterfly is coloured with copics.

 I have used Lisa's Nested Flag dies and two stencils, the lattice and spring blooms and added Distress Oxide inks.  The flower is just one of the four point bloom stamps to which I have added some Mermaid Tails glitter - I just ADORE this stuff!!  It is awesome, changes colour depending on what you add it to and what card you use!! Beautiful.

Then I used one of the nested label dies and added the fabulous sentiment to it.  The backing paper is one of Lisa's fabulous double sided papers - you really NEED these, honest you do!

I used Pinflair glue to add the butterfly to the flag to give it a little bit of dimension and I shaped the petals on the flower for the same reason.

I know, it is really simple but when the images are this beautiful why would you want to hide it eh?

Remember we have a fabulous group on Facebook which you can find here.  The Design Team will share sneaky peeks of upcoming products and then just before the show we will start to show full products so you know what you can do with these gorgeous elements before the show even starts.  This group is also a place to showcase your own work using Lisa's products.  What's more, you might even win something fabulous now that we have a monthly challenge for you to enter.

Why not give it a go?  We are not looking for perfection, we are looking for fun projects that you have enjoyed making and are proud enough to show off.  Remember to add your project to the album in the group so that when it comes to voting for a winner (yes it is a chosen winner, no random selection here folks!)

You can also find inspiration on Instagram where the DT share all their makes as well as Pinterest where there are boards for all of Lisa's products.

Remember to tune in to Create and Craft on Friday 3rd April you really won't want to miss it!

Happy Crafting. xx

Friday, 20 March 2020

Butterflies make me smile.

Morning everyone.
This morning I would like to share with you a card I have made for Lisa's upcoming show on Wednesday 25th March at 10:30.

My card features the fabulous Daisy Burst Stamps and Die set as well as the Butterfly flourish stamps and die set.

In order to make this card I firstly masked off a section so that I could stamp my Daisy Burst stamps in two colour ways, Wilted Violet and Storm Grey Distress Oxide inks and using two sizes of the stamps.  Then once the ink was dry I masked off the part where I had stamped and made a narrow band either side of my stamping and added Wilted Violet and then moved my masking to make a second band to add Storm Grey on the outside of the Wilted Violet.

Next I masked off the whole section of stamping and stamped the Daisy Burst large stamp on either side of the first lot of stamping, again using Storm Grey.

Now, I don't know about you but sometimes when I am stamping I have a tendency to get ink where it shouldn't be or my stamping isn't as good as it could be!  So, what to do?
Well, this is where the butterflies come in.
Now I could tell you that I planned the placement of the sentiment and the butterflies but that would be a big fat fib! Lol
No, the nested flag die has been added where my stamping didn't quite work properly and I added the Smile sentiment which comes with the Butterfly Flourish Stamp set and added three of Lisa's fabulous shimmery pearls in the bottom left corner for a bit of detail.

The other butterflies are also covering little mishaps, even the little teeny weeny one in the top left hand corner.

So, when you have little happy accidents, because us crafters don' make mistakes lol, you can always just add a butterfly!

So there you go then, a quick masked butterly and daisy card.

Remember to tune in next Wednesday 25th March at 10:15 to see not only the stamps and dies I have used here but also some fabulous new goodies too.

You will now be catching our Design Team sneek peaks of the new products if you are a member of our facebook group Crafting with Lisa Horton
If you are not already a member then please just click the Join button, answer the questions (nothing heavy honest) and then you're in.
Hope to see you there.
We also have a monthly challenge running too, so why not join in with that once you have joined?
There are also Lisa Horton Crafts boards on Pinterest and some of the DT have You Tube channels with demos on too.  So plenty of options to see what others have done with Lisa's fabulous products.

Right, best get on.
TTFN

Tuesday, 17 March 2020

Tina Foster - The Spring Hanging Basket


HI everyone, its great to know you're taking a look at my latest blog for Lisa Horton Crafts. Thank you so much for joining me.  I decided to have a spring theme this time, and thought about what I like most about this time of year. Hanging baskets make a lovely display in the garden, and they will also form a pretty card too.


The Spring Hanging Basket

Tools
Nested Flags Die Set
Daisy Burst Edgers Die Set
Four Point Flowers Die Set
Four Point Flowers Stamp Set
Ticker Tape Sentiments Stamps
Green Sisal
Corner Rounder
Distress Oxide Ink Pad - Squeezed Lemonade
2 Eyelets

I started my project with a 5inch x 9inch card blank, and shaded the centre slightly with a Distress Oxide Ink Pad in Squeezed Lemonade to add a little interest in the background.

Next I die cut my basket by taking a flag die, use the 5th largest one and cut it with a trimmer as shown in the photograph. 


Do this 3 times and then stick them together as shown.


Make a hole on each side of the basket for your eyelets and pop one on each side in the colour of your choice. Add double sided foam tape to the back of the basket after shaping the sides with your scissors - to give it a little dimension. Stick it on to your card.

Next, I used the the largest of the nested flags die and cut out 3 straight pieces for the hangers. I thought i would do it this way to get the stitched detail.


Push one end through the eyelet and fasten to the card with glue, making sure it is pointed to the centre of the card. 

Attach the middle one directly to the card. I took a little of the green sisal and popped it on the card above the rim of the basket with a little glue. 

Die cut your flowers in the desired colours. I used mostly the daisies with just a couple of the four point flowers. 


Stamp your leaves and then die cut them curling the edges to add dimension and place them amongst the flowers.


Die cut two of the smallest flags, stamp your message using the ticker tape sentiments and add to the flags, then use foam tape to attach to your card. 

Finally I cut 2 of the four point flowers and mounted them on foam tape. I stuck down the hangers leaving a little slack to drape over the flowers and placed the four point flowers over the top!

Hope you’ve enjoyed making your spring basket! Until next time, happy crafting!!! 🌸