How to make a simple, stencilled notebook
Hello - I am back again with an idea for making a simple notebook using one sheet of A3 paper and a selection of fabulous stencils from Lisa Horton Crafts.
To make this notebook you will need :
1 sheet of A3 paper (approx 160 gsm) or stick 2 sheets of A4 paper together to make the same.
8 sheets of white stamping card (measuring 4" x 5.5")
Oxide inks or blendable inks of your choice
Black Versafine Clair
Pencils and Pens of your choice
Lisa Horton Crafts Stencils
Lisa Horton Crafts Majestic Butterfly stamps
Lisa Horton Crafts - In the Loops stamps
Ribbon and red line tape
To make this notebook begin by making a "One Sheet Notebook" using the A3 sheet of paper
Full instructions can be found on my YouTube Channel
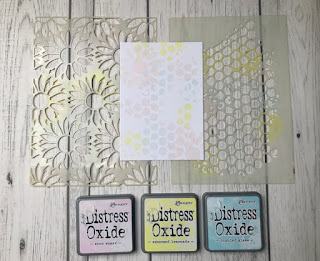
Next, take a variety of the Lisa Horton stencils and blend ink through them using the colours of your choice. I tend to colour up in three areas (using the first colour ) through the stencil. Re-align the stencil and repeat the process twice more using inks 2 and 3. Then I look for the gaps and repeat again with stencil 2
Here are the different stencil combinations I used to start you off:
TARTAN AND SUN BURST
(the Oxide Inks I used were - Pink Spun Sugar/ Yellow Squeezed Lemonade/ Blue Tumbled Glass)
SUN BURST AND HIVE
MEDIEVAL AND DAISY CHAIN
PENNIES IN LINE - HIVE - HEART FLURRY
PENNIES IN A LINE AND DAISY CHAIN
Ink up all 8 pieces of paper.
Adhere 6 of the pieces inside your "One Sheet Notebook". Save 2 pieces for the covers of your Notebook.
To decorate the covers of your Notebook. Stamp two butterflies of your choice onto a sheet of paper I used pale yellow). You can also stamp the same butterfly directly onto your stencilled papers but this is not strictly necessary.
Cut out the stamps on the extra piece of paper. With pencils and pens, enjoy colouring in the stunning stamps that Anne Ruffles has designed. Stick the two butterflies onto the stencilled background. I used sticky pads (to add depth) to the centre of the butterfly - showing the stamped butterfly underneath. I also added a few of the circles from Lisa's In the Loop stamps plus a few of my own squiggles and.sequins.
Add red liner tape to the central horizontal line in order that you can secure the ribbon.
You will hide the workings underneath the stencilled front cover.
Your Notebook can now be written in directly or maybe you could add a few tags and send it to a friend to write lists in. Alternatively you could add pockets and insert mini cards and envelopes to send to your family. The Notebook is so versatile you could adapt it in many ways.
As you can see - the combination of Lisa's stencils and stamps will allow you to make a creative, beautiful piece of artwork. It is really up to your imagination.
I hope you will give this project a go and please do share your creations with us on our Facebook Group - Crafting with Lisa Horton.
If you need further inspiration then why not check out our Pinterest Pages too
Until next time. Happy crafting
Love - Elisabeth x


What a fabulous project Elisabeth and such gorgeous soft spring like colours too.
ReplyDeleteLove it. Xxxxx
Thank you so much Dawn. I thought the spring like colours would lift our spirits xx
DeleteJust beautiful, gorgeous project x
ReplyDeleteThank you Cathryn. These books are so versatile cc
DeleteA beautiful little notebook.
ReplyDeleteLove the colours perfect for the time of year.
Spring is a lovely season coming after the dark days of winter. X
I completely agree Glenys. Thank you for your lovely comment xx
DeleteBeautiful project .... love the soft yellow x
ReplyDeleteI love pale yellow too. It reminds me of primroses xx
DeleteBeautiful 😍
ReplyDeleteThank you Natasja xx
Delete