Happy Wednesday everyone.
I hope your week is going well so far?
I have to tell you that recently I have been totally blown away by some of the fabulous makes I have been seeing in the group. You really do seem to be enjoying using your fabulous Lisa Horton Crafts goodies and that makes me really very happy.
As a Design Team we always say how fabulous Lisa's products are don't we? I am sure there are people out there that think we say it purely because we are on the Design Team. However, I will tell you that without exception, every time we say something is fabulous we 100% genuinely mean it. If you just look at the samples in the group I am sure you will agree that the love for the product really does shine through.
What superb shows on Create and Craft - I hope you all managed to get what you wanted and once again on behalf of Lisa and Danny, thank you for your unwavering support.
I am wishing Lisa all the luck in the world with her trip to the USA and the Creativation event. Yes it is going to be busy, hectic, tiring and hard work BUT the rewards from all that hard work are going to be AWESOME!!
I hope both Lisa and Miriam have a fabulous time and I for one can't wait to see any little live videos they can manage to do into the group. Remember, keep your eyes peeled because they will probably just pop up unannounced.
***
If you missed my live on Monday and would like to watch the edited version just click the pic below to go and view.
***Well, it is Wednesday and as the title suggests, it is Project Day here on our fabulous blog.
So, over to the lovely Mary Kelly for another fabulous project.
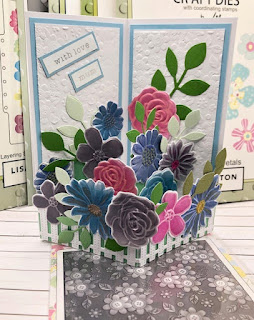
Floral Balcony Card
You will need:
LHC Floral Blooms Stencils, embossing folder and dies
LHC Floral Pocket Petals
LHC Set The Scene - Garden Greenery
LHC Blending Inks Release 1- Spiced Plum; Ocean Blue; Candy Pink; Pineapple Crush
LHC Modern Floral Button Blooms Embossing Folder
LHC Bold Phrases
LHC A5 Sticker Sentiments
LHC Ultimate
Die cutting machine
Trimmer
Glue
White card
Green card
Blue card
Step 1: Cut lots of foliage using the leaves dies from the floral pocket petals - I used lots of my scrap green card. Also stencil, cut and emboss lots of flowers from the Floral Blooms.
Step 2: You will need three pieces of card for the card base. Picture 1 shows the 6 x6 inch piece scored at 3 inches. Picture 2 shows the 7 x 1 1/4 inch strip which you score at 1/2; 3 1/2; 6 1/2. Picture 3 shows the 2 1/4 x 4 3/4 piece which you should score at 1/2; 2 3/8; 4 1/2.
Step 3: Burnish and fold all pieces of card as shown. How they will look when put together is the second picture.
Step 4: Cover the strips with green card. The long strip needs 2 pieces of 3 x 1 1/4. The shorter strip needs 2 pieces of 2 1/4 x 1 7/8. I have chosen to use two sections to cover each strip to reduce bulk at the score lines if you want to fold your card in two for posting. It will fit in a 6 x6 envelope when flat too.
Using the fence die from the garden set cut two pieces and overlap by two posts in the middle to create one long section. Trim of two posts of the fence from one end and then score in the middle - there are 9 fence posts either side of the score line. Attach the to the long strip.
Step 5: Prepare the layers for the card front. Cut two blue pieces of card 2 3/4 x 5 3/4. Cut two white layers 2 1/2 x 5 1/2. Emboss the white layers with the Button Blooms folder. DO NOT ATTACH TO YOUR CARD BASE YET. (Cut another set of the layers if you want to add to the reverse of the card)
Step 6.: Cut a little wedge of the tabs on each strip. Attach the long strip to one side of 6x6 square. Ensure the bottom of the strip and card are flush. Add your embossed layers. Lay the card flat and add glue to the other tab and attach. Add the other embossed panel.
Step 7: Lay the other green covered strip on the base behind the long side. It is important to ensure the score line of the strip lines up with central score on the base card. Ensure all bottom edges are flush to allow the card to stand up.
Step 8: Decorate to your hearts content!! Do not lay decoration across a score line.
Step 10 : Optional Extra: Add the second set of layering panels to the card reverse. Use some of the florals and foliage to add interest. Cut a bold phrase in coordinating cardstock and attach. Your card is ready for your message:)
What a gorgeous project Mary, thank you so much.
***
Don't forget that I will be live tomorrow at 1pm in the Crafting with Lisa Horton Group as usual.
***
Finally, as always we leave you with our Words of Wisdom
And with that I will see you on Friday.
TTFN
xxx
.webp)

.jpg)


.jpg)


.jpg)


.jpg)