Morning all.
Well, what a start to the week eh? Those of you who joined me for my live on Monday will know exactly what I'm talking about. I mean, talk about nothing going to plan!! Apparently, there was an outage round the corner from us which affected most of the village so it was totally out of my control.
It's mad isn't it - it's not until something like that happens that you suddenly realise how dependent we have all become on our devices and computers. It was really odd talking to everyone and not being able to see the full conversations like I usually do - not something I could do on a regular basis, that's for sure.
Still, we managed to get through it didn't we? And for those who missed all the fun and games, the edited version of Monday's live is now available on our You Tube channel if you'd like to watch.
***
Well, it's Wednesday again and that means another fabulous project for you and once again our lovely Mary Kelly has come up trumps.
You will need:
LHC Hydrangea corner embossing folder and die
LHC Foliage Elements Embossing Folder
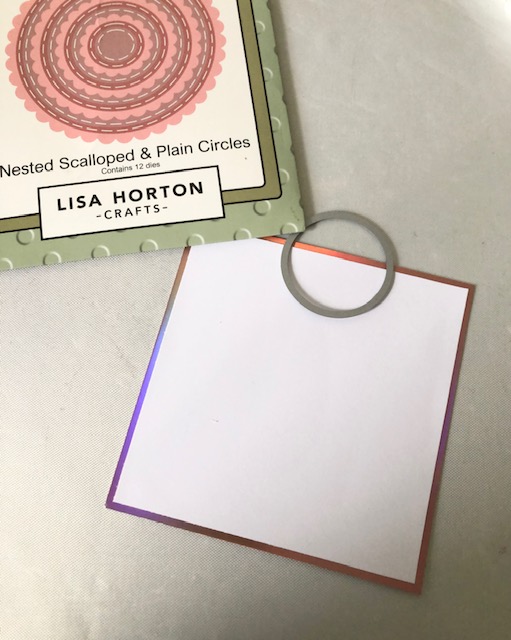
LHC Scalloped circles (optional)
LHC Textured card stock
LHC Satin cardstock
LHC Bold Phrases
LHC Build a sentiment - occasions stamps and dies
LHC Dewdrops
Ultimate
LHC Black ink
LHC glue
Double sided tape
White card
Ruler
Pencil
Scoring tool
Trimmer
Step 1: Cut and emboss the corner hydrangea. I have chosen to keep mine white but you could use your stencils to add colour.
Step 2: Take a sheet of Textured card and cut at 6inches to give two pieces 12 x6. Score along the long side at 6inches on both pieces. Fold and burnish to give two 6x6 cards.

Step 3: Cut from corner to corner to create a triangle. The left-hand card should be cut from top left to bottom right. The right-hand card should be cut from top right to bottom left. See pictures. My top tip is to lay your card in your trimmer and line up the points. I would also cut from the middle as cutting at the point can be difficult and may crumple the corner.
Step 4: Lay the two squares on top of each other and glue together to create your card base. You are ready to cut your layers. Cut satin card 5 ¾ x 5 ¾ inches. Cut this into triangles. Cut a white square to 5 ½ x 5 ½ inches and cut into triangles. Use the triangles you cut of the base card and trim to 5 ¼ x 5 ¼ inches and cut into triangles.
Step 5: Emboss the last layer - in my case blue, and layer all together and attach to card fronts. Cut the sentiment in satin card.
Step 6: We are ready to create the insert. Cut a satin card square 5 ¾ x 5 ¾ inches and a white layer 5 ½ x 5 ½ inches. Glue together. After the glue has dried cut a fingerpull using the smallest circle in the scalloped circle set. (This is optional) Use a ruler to ensure the semi circle is in the middle of the top edge.
Step 7: Lay down your insert with the hydrangea corner and trim to fit.
Step 8: Place your insert into your Ultimate and stamp the internal message.
Step 9: Add tape to the left hand inside front - keep to the edge/score line. Glue down. You now have a pocket for your insert. A gift card would fit really well in here!.
Step 10: Add the sentiment to the front and dewdrops to the hydrangea and your card is finished!
Wow, what an absolutely stunning project Mary. Thank you so much.
So are you going to give this one a go?
Remember to share your makes into the group if you do.
***
Finally, on to our Words of Wisdom
See you Friday.
TTFN
xxx


.jpg)
Love the card and great idea to make it into a gift card holder… might have to give it a go 🤞🤞
ReplyDeleteI hope you share your make in our Crafting with Lisa Horton Group Karen. Dx
DeleteLovely card Mary
ReplyDeleteDon't know why my name Sandie Coleman isn't coming up xxx
ReplyDeleteIt's probably Blogger having a hissy Sandie. Lol. Dx
DeleteLovely card.
ReplyDeleteSuch a lovely card Mary. Su xx
ReplyDeleteLovely project. Looks good for masculine makes too. I'm sure you will have a calmer live on Thurs. At least it makes me feel that I'm not the only one who has those days 🤣 x Heather Butcher
ReplyDeleteLol Heather. Well, it was definitely calmer in today's live that's for sure. Don't need too many lives like Monday! Lol Dx
DeleteAww Dawn the live was great power off or not. I can imagine how you ,it’s have felt though bless your heart 💜
ReplyDeleteIt all came together in the end and hope you managed to edit the video ok x
Mary’s card is such a fabulous one. I’d like to try it at some point along with all the other thousands I said I’d try lol 😂 I shall get around to trying some of the Wednesday cards eventually. There are so many new products to use at the moment I’m just wanting to try it all out 😄
Beautiful words of wisdom and as always a fabulous blog.
Thank you Dawn for all of it.
Lots of love
Connie 💜
Thank you for your lovely comment Connie, as always. I'd worry if there was no comment from you on the blog. Dx
Delete