Friday 14 April 2023

FABULOUS FRIDAY

Good morning lovely people.

I hope you have had a fabulous week and that you are looking forward to Lisa’s live later?

I know that you have already seen some fabulous samples from the Design Team but I know there are so many more for you to see, and let me tell you they are all simply stunning.

***

If you missed my live yesterday then the edited version is available to view on our You Tube channel, just click the pic.


So, I have news!

You all know that Lisa’s website has been going through a major upgrade and that we are going to be able to include so much more for you all going forward.  Part of those changes is that the blog will move to within the website and with that move comes some changes.

We are still working on the finer details of exactly what the content will be but it means that this blog will no longer be active.  So today’s blog will be the last one that you will see here.

Now I know that a lot of you like reading the blog but nothing stays the same forever does it?  With Lisa’s brand growing across the World on a daily basis we need to adapt and move and grow with it.  It will still be full of fabulous content featuring the awesome Lisa Horton Crafts products that you have come to love so much, so please bear with us during this time of change and I promise you that you won’t be disappointed. 

At the end of the day you all know that Lisa does what she does with you – her loyal customers and friends – in the forefront of her mind.

So Lisa will be live at 7pm as usual.

Here are all the links you will need:

Lisa Horton Crafts on You Tube (Best option)

Lisa Horton Crafts on Facebook (Lisa's business page)

Crafting with Lisa Horton on Facebook (our awesome group)


So for our last ever Words of Wisdom, 

I thought this was so appropriate. 


Thank you for reading and see you soon.

TTFN

xxx

Wednesday 12 April 2023

Wonderful Wednesday - Project Day

 Happy Wednesday morning to you all.

I hope you are all well?  

What on earth is happening with this weather just recently?  It can't make up its mind from one minute to the next just lately can it?  One minute it is bright sunshine and the next it is absolutely throwing it down.  I remember some of you saying that you had thunderstorms on Monday so I'm just hoping that we don't get those as I really REALLY don't like thunder.  I mean, during the day I'm not too bad but if it happens at night I am a right scaredy cat! Lol.

Roll on Summer eh?  Let's just hope we get one!!

***

Right, so if you missed my live on Monday then the edited version is available to watch on our You Tube channel.  Just click the pic below to watch.

It was great to go back and use some of the earlier product that Lisa brought out.  The eagle eyed amongst you will notice that I also added some pastel dew drops on to the front sentiment.
 I hope you enjoyed this one as much as I did?

And, if you missed Claire's live yesterday, the edited version is now also available to watch on our You Tube channel.  Just click the pic.

***
Well, it is Wednesday so you know by now that means a fabulous project for you to have a go at.  So it's over to the lovely Mary Kelly with your detailed instructions.

Partial Die-cutting to create an easel card with the Tropical Flowers

You will need:
LHC Tropical Flowers stencils, die and embossing folder
LHC Variegated Leaf Embossing Folder
LHC Build a Sentiment Collection
LHC Blending inks - Early Sunrise, Margerita, Woodland Moss and 
Strawberry Sundae
Ultimate
Trimmer
Glue
Die cutting machine
Scissors
Foam pads
Score board and tool
White card
Red card/paper

Step 1: To make the main card base cut an A4 sheet of white card at 6 inches along the short side. On the long side score at 6 inches. Fold and burnish in half. Note; one side will be the shorter than the other but it won't matter and means you can use your A4 cardstock.  Fold this shorter side in half  again - see picture. This will create your easel card base.

Cut a second piece of card 6 x 6 inches square. 


Step 2: Using your colours of choice stencil the tropical flowers, die cut and emboss.

Step 3: You will die cut the interesting edge of the tropical flowers into the 6 inch square piece of card. Lay the die down and secure with masking tape as shown. Ensure your cutting plate does not cover the edge.  Run through your machine. You may need to snip the outer edges form the card - see picture 3 below.  Your stencilled tropical flower should match the edge perfectly. Do not attach it yet.


Step 4: For the matts and layers cut a piece  of red card 3 x 5 3/4 and a white layer for on top to 2 7/8 x 5 5/8. This will cover the area below the tropical flowers. Also cut a 5 3/4 inch square piece in red and a white layer 5 5/8 inches square. Emboss the white layers in the variegated leaves folder. Layer up.


Step 5: Add some foam pads to the reverse of your flowers and add to the panel.

Step 6: Add the panel to the base. It will glue to the right hand side of the front. Ensure you line it up.  Next stamp and die cut your chosen sentiments.  Add foam to the sentiments and add one word below the flowers and one on the base to act as a stopper. Add a few gems/embellishment if you wish!


Another gorgeous project Mary, thank you. 

***
Finally, to our Words of Wisdom

See you Friday

TTFN
xxx


Monday 10 April 2023

MARVELLOUS MONDAY

 Morning all.

I hope you all had a very lovely Easter weekend, however you chose to spend it?

Personally, I had a lovely day on Friday as I took my daughter and my grandchildren out for lunch to our local Garden Centre.  They have a lovely little play area for the kids who raced around like little mad things before we went for our lunch.  We ate a little earlier than usual because the lovely restaurant always gets really busy at this time of the year, what with it being Easter AND half term.  But it was lovely, the food is always fabulous, piping hot and tasty - just great.

So because the sun was shining we went back to the play area and let the children run their dinners off.  They have a little train that runs when the weather permits so we did that too.  All in all it was a really lovely day and I had the best time with my most favourite people.  

They all took their Easter Eggs home ready for Easter Sunday and I'm pretty sure they all had chocolate for breakfast! Well it's the law on Easter Sunday isn't it?? Lol.

***

So, what's on in Lisa Horton Crafts land this week then?

Well, it's a pretty quiet week really, leading up to next week's shows for the Create and Craft birthday celebrations.  

Monday 10th April

I will be live at 1pm in the Crafting with Lisa Horton Group as usual so I hope you can come and join me for our chatty crafting session.

Tuesday 11th April

Claire will be live in the group at 2pm as usual.

Wednesday 12th April

Project Day on the blog with another fabulous project.

Thursday 13th April

I will be back at 1pm in the Group and today I will be using some of the fabulous new product that is on next week's Create and Craft shows so be sure to join me for that.

Friday 14th April

Friday means Lisa's Friday Night Live at 7pm as usual.  (Links later in the week)

So there you go, nice relaxed week for you this week.

***

Finally, on to our Words of Wisdom


Definitely food for thought eh?

See you Wednesday

TTFN
xxx


Friday 7 April 2023

FABULOUS FAST CRAFT FRIDAY

Happy Friday everyone.

I hope you have all had a fabulous week.

Thank you all for your good wishes for my husband's hospital appointment on Wednesday.  It went really really well, in fact it couldn't have gone any better.  He had been referred to Urology on a 2-week wait for his prostate.  Anybody who knows anything about the cancer pathway will know how it feels to hear the words 2-week wait referral.  We have both been on tenterhooks since the 23rd February.  However, the doctor said that everything in his opinion seemed absolutely normal and that he just wanted to do a blood test to make absolutely certain but couldn't see that the result would be anything other than normal.  I think I nearly blew the doctor off his chair with the sigh of relief. 😂

We've both been short tempered with each other for weeks but now that is out of the way we might just get on a little better. Lol

These things are certainly sent to try us aren't they?

***

Anyway on to happier things.

If you missed my live yesterday using the simply stunning Brand New Tropical Flowers then the edited version is also now available to watch on You Tube, again just click the pic below.

***

So, it's Friday and once again the lovely Maria is here with a fabulous Fast Craft Friday project for you to have a go at.  Over to you Maria.

Hello everyone, Maria here.

I do like a bit of quick and easy stamping, and I don’t need much persuading to get out my Cloud 9 Matt Blending inks, perfect for a card in 20 minutes or less!

YOU WILL NEED 

Off The Edge Vintage Roses A5 stamp set LHCCS070
Nested Stitched Bubble Squares cutting dies LHCCD105
Cloud 9 Matt Blending inkpad Deep Ocean
Black inkpad
Fine paintbrush and water
Cutting die of your choice for the sentiment
Watercolour card
7 inch card blank


Stamp the large rose corner on watercolour card with Deep Ocean ink, let it dry just for a minute.


Use a fine paintbrush, slightly damp but not dripping wet, to gently pull some of the ink from your image into the image to colour, leave some white areas through, this will give highlights.

While you wait for your image to dry, smear your Deep Ocean ink on your messy mat/craft sheet and spray with water, wipe an A5 piece of watercolour card through the ink, it doesn’t have to be completely covered.

Clean and dry your mat. While your extra card dries you can use your medium sized squares to die cut your stamped image and a slightly larger blue layer.

Die cut a medium size bubble square from your inky watercolour card and layer up with your image and other coloured layer.

On your leftover inky card, stamp and die cut your sentiment.

Stop the clock, we are almost there but have to decide on layout before we glue together, which one do you like???


Well I do like it, and it was certainly well within the 20 minutes, but maybe we should use up a few more minutes?


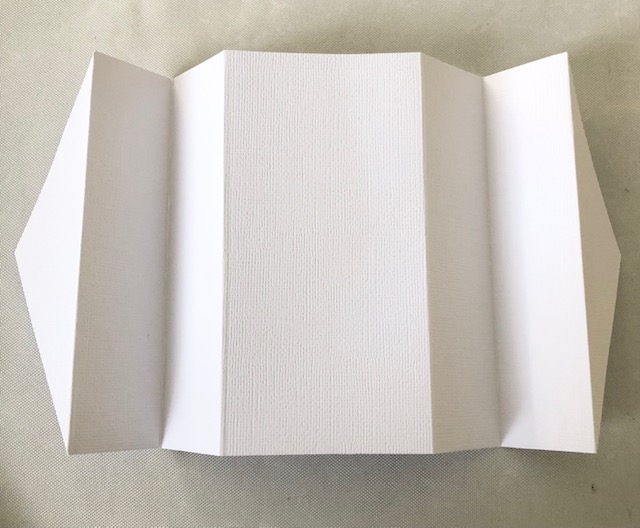
Score down the centre of your card front to create a Z fold.

On the inside of the card add the rose corner, for a nice soft look stamp onto spare paper first.

Fix your main image to the front fold of your card and add the sentiment with foam pads, that’s it!

And we are still within our time…

I hope you like it, we’d all love to see your version over in the Crafting With Lisa Horton Facebook group.

What a gorgeous project Maria, I do love a tone on tone card and this is gorgeous.

Thank you.

***

Well, she's home!!  She might be a little bit jaded but I just know Lisa is itching to see you all tonight for her Friday night live at 7pm.

Not only will she have oodles and oodles to tell you all (and I'm sure some stuff she really shouldn't be telling you too! Lol) but she will also be giving you the fabulous discount code I told you about yesterday on my live.

Don't know what I'm talking about?  Then you really need to tune in tonight at 7pm to find out more.

Places to watch.....

Lisa Horton Crafts on You Tube (best option)

Lisa Horton Crafts on Facebook (Lisa's business page)

Crafting with Lisa Horton on Facebook (our fabulous group - have you seen the number of members!!!!! Eeeeeek)

So, all I will say is please don't be late - I really do think this will be a case of Miss It Miss Out!  Just my opinion obviously but don't say I didn't warn you. Lol.

***

Finally, to our Words of Wisdom


See you Monday folks.

TTFN
xxx


Wednesday 5 April 2023

Wonderful Wednesday - Project Day

Happy Wednesday everyone.

I hope you are all having a lovely week so far.

I'm pretty sure that yesterday was the last day of the show at Creativation so then it will be a case of packing everything away and getting ready to fly back to Blighty.

I hope they have all had the most marvellous time and achieved everything they wanted to achieve - which I'm sure they will have done, and more if I know Lisa and Miriam.

So safe flight home all of you, can't wait to have you back in the fold.

***

So, I won't be around very much today as I shall be at the hospital with the husband for an appointment.  I'm hoping it all goes well and turns out to be nothing but you just never know do you.  Keep your fingers (and toes) crossed for us won't you? 🙏🙏

***

If you missed my live on Monday, the edited version is available to watch on our You Tube channel so just click the photo below to be whisked off to You Tube. Lol

Although Claire wasn't live yesterday, she did leave a video for you all to watch but if you missed it here is the link to go and watch at your leisure.
***
So, with it being Wednesday that means we have another fabulous little project from the lovely Mary Kelly for you.  So over to you Mary.

 Fun Fold Card that fits in a 6x 6 inch envelope!


You will need:
LHC Tulips stencil, embossing folder and die (other options that would work include the marigold)
LHC Rustic Hessian DL Embossing Folder
LHC Bold Phrases
LHC Satin card
LHC Textured white card
LHC Blending Inks - Margarita, Sweet Violet and Woodland Moss
Ultimate
Trimmer
Scissor
Glue
Foam Pads
Scoring Tool
Pencil
Rubber
Ruler

Step 1: Cut a sheet of 12 x 12 textured white card in half. Score along the long side at 11/2; 3; 4 1/2; 7 1/2; 9; 10 1/2. Using a pencil and ruler mark at 3 inches on each short side. Draw a line to guide your cutting. Cut  using your trimmer. Rub out any remaining pencil mark.


Step 2:Fold and burnish to give a sequence of valleys and mountain - your base should like the photo below.

Step 3: Stencil your floral element- in this case the tulips. Cut and emboss.


Step 5: To prepare the small panels cut 4 pieces of satin card stock to 1 1/4 x 5 3/4. Cut 4 pieces of white card to 1 x 5 1/2. Emboss the white panels using the rustic hessian embossing folder. Layer these. Cut a larger piece of satin card for the main panel to 2 3/4 x 5 3/4 and a white layer 2 1/2x 5 1/2. Emboss this panel using the tulips folder for added interest. Layer these.


Step 6: To layer the ends cut 2 panels of satin card to 1 1/4 x 5 1/4. Using a pencil mark at 2 5/8 on the long side. Cut from the far corners to this mark to create a triangle. Attach to the ends.

Step 6: You could, if you wanted,  add a sentiment and leave the card at this stage. However I trimmed about 1 inch from the stems of the tulips and added foam before setting on the front panel.  I also cut a bold phrase from satin card and added them to the outer most white panel in opposite directions.  Your card is ready and can be folded with just the pointed panel visible either side of the front panel making it 6 x 6 for posting. 

Oooh another beautiful card Mary, thank you so much.
Don't forget to share your makes in the group if you give this a go.
Remember there is the card of the month feature to think about! Lol

***
Finally, as always, to our Words of Wisdom

Something I think we could all do with putting in to practice at times eh?

So with that, I'll see you Friday.

TTFN
xxx