Happy Wednesday everyone.
I hope you are all having a lovely week so far.
I'm pretty sure that yesterday was the last day of the show at Creativation so then it will be a case of packing everything away and getting ready to fly back to Blighty.
I hope they have all had the most marvellous time and achieved everything they wanted to achieve - which I'm sure they will have done, and more if I know Lisa and Miriam.
So safe flight home all of you, can't wait to have you back in the fold.
***
So, I won't be around very much today as I shall be at the hospital with the husband for an appointment. I'm hoping it all goes well and turns out to be nothing but you just never know do you. Keep your fingers (and toes) crossed for us won't you? 🙏🙏
***
If you missed my live on Monday, the edited version is available to watch on our You Tube channel so just click the photo below to be whisked off to You Tube. Lol
Although Claire wasn't live yesterday, she did leave a video for you all to watch but if you missed it here is the link to go and watch at your leisure.
***
So, with it being Wednesday that means we have another fabulous little project from the lovely Mary Kelly for you. So over to you Mary.
Fun Fold Card that fits in a 6x 6 inch envelope!
You will need:
LHC Tulips stencil, embossing folder and die (other options that would work include the marigold)
LHC Rustic Hessian DL Embossing Folder
LHC Bold Phrases
LHC Satin card
LHC Textured white card
LHC Blending Inks - Margarita, Sweet Violet and Woodland Moss
Ultimate
Trimmer
Scissor
Glue
Foam Pads
Scoring Tool
Pencil
Rubber
Ruler
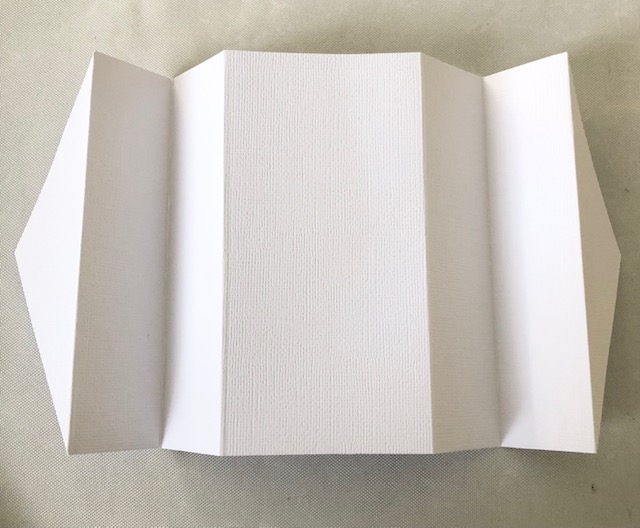
Step 1: Cut a sheet of 12 x 12 textured white card in half. Score along the long side at 11/2; 3; 4 1/2; 7 1/2; 9; 10 1/2. Using a pencil and ruler mark at 3 inches on each short side. Draw a line to guide your cutting. Cut using your trimmer. Rub out any remaining pencil mark.
Step 2:Fold and burnish to give a sequence of valleys and mountain - your base should like the photo below.
Step 3: Stencil your floral element- in this case the tulips. Cut and emboss.
Step 5: To prepare the small panels cut 4 pieces of satin card stock to 1 1/4 x 5 3/4. Cut 4 pieces of white card to 1 x 5 1/2. Emboss the white panels using the rustic hessian embossing folder. Layer these. Cut a larger piece of satin card for the main panel to 2 3/4 x 5 3/4 and a white layer 2 1/2x 5 1/2. Emboss this panel using the tulips folder for added interest. Layer these.
Step 6: To layer the ends cut 2 panels of satin card to 1 1/4 x 5 1/4. Using a pencil mark at 2 5/8 on the long side. Cut from the far corners to this mark to create a triangle. Attach to the ends.
Step 6: You could, if you wanted, add a sentiment and leave the card at this stage. However I trimmed about 1 inch from the stems of the tulips and added foam before setting on the front panel. I also cut a bold phrase from satin card and added them to the outer most white panel in opposite directions. Your card is ready and can be folded with just the pointed panel visible either side of the front panel making it 6 x 6 for posting.
Oooh another beautiful card Mary, thank you so much.
Don't forget to share your makes in the group if you give this a go.
Remember there is the card of the month feature to think about! Lol
***
Finally, as always, to our Words of Wisdom
Something I think we could all do with putting in to practice at times eh?
So with that, I'll see you Friday.
TTFN
xxx

.jpg)


.jpg)
Hope everything goes ok at hospital 🤞🤞🤞 looking forward to our Friday night live. Maybe we should have guesses at how long over 8pm Lisa goes 😂😂😂
ReplyDeleteAww lovely blog Dawn as usual.
ReplyDeleteWishing Lisa and Co a very safe return to the uk. Also I really hope everything goes well at the hospital Dawn fingers crossed 🤞 for you 🥰
Fantastic lives this week. Loved yours Dawn and going to try it for sure. I had to catch up with Claire’s and she made such a beautiful card too. Thank you to both of you. 🥰
Mary this project is absolutely beautiful I may have a go at this one too lol thank you so much.
Fabulous words of wisdom again Dawn.
Lots of love and hugs 🤗
Connie 💜
Lovely blog to read and learn from as per usual.Very pretty cards to make as well.A bonus. Thank you x
ReplyDeleteHope the appointment went well. Love the sentiment. Xx
ReplyDeleteSorry forgot my name TRUDY X
ReplyDelete