Morning all
Well, today's the day that Lisa launches her Ulti-Mate 3d Floral Alphabet release.
I know it isn't the cheapest release but I do have to say it is exactly what it is portrayed as - an Ultimate collection.
It is a collection that you can use on cards, in frames, in scrapbooks, on home decor, for any gender, any age and any occasion.
If you can't afford the big bundle, why not go for the alphabet, numbers and flowers die set - your projects will look slightly different but equally as beautiful.
Show times are:
Wednesday 26th - 6pm/7pm double show and 9pm
Thursday 27th - 10am and 2pm
Hope you all manage to bag what you want. I've ordered mine! 😉
***
So, with it being Wednesday we are here with another fabulous project.
This gorgeous project is brought to you by our lovely Mary Kelly.
Take it away Mary.
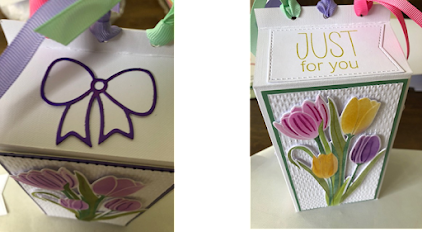
TULIP GIFT BOX
LHC Tulip Embossing folder and
die
LHC Tulip Layering stencils
LHC Nested flag die set
LHC Ribbons and Bows Dies
LHC Layering garden rose stamp/stencils - sentiment
LHC Rustic Hessian embossing folder
LHC Satin card
White card – 300gsmColouring pencils/markers/paints
Die cutting machine
Scoreboard
Scissors
Scoring tool
Cropodile or hole punch or a bulldog clip
Ribbons
Guillotine/Trimmer
Ultimate
Coloured inks for blending and stamping
Step 1:
Take a piece of A4 card and along
the long side score at 2 ½ inches, 9 ¼ inches and 11 ¼ inches. The last 1/2
section is the top tab. Rotate 900 anticlockwise
and with the tab at the top score at ¾ and 4 ½ inches. Do this on another piece
of A4 card – fold and score all lines
Step 2:
With the piece of card in
the portrait orientation and the tab on your right cut up the first score line
at the bottom to the first horizontal score. Cut the second score line to the
first horizontal score and completely remove the small rectangle. Take a little
wedge from the tab. Turn and repeat at the top. Do this for the other piece of
card.
Step 3:
Lay the two pieces down so the
tab overlaps and join together as shown:

Step 4:
Fold over tab on the far right
and add glue. Then fold the left hand side over and it should meet perfectly to
create a square tube. The bottom sections are going to form the bottom of the
box. Trim a small wedge of three of the four sections as shown below. Fold the
three sections in on one another adding glue as you go and using the full
section to cover everything.
Step 5:
Your box will now have taken
shape and its time to add the decorative panels. Use your stencils and dies to
create your tulips – use whatever colours you like. I have chosen to decorate
all four sides of the box but you might just do one.
Step 6:
To create the matt and layers cut
four pieces of satin card 6 ½ x 3 ½ inches. The white layer should be 6 ¼ x 3 ¼
inches. Run the white layers through your machine in the rustic hessian folder.
Matt and layer and add the tulips.
Step 7:
The top of your box has four
sections which all have a top tab. Remove two of the tabs – make sure they are
opposite to one another. Punch holes in the remaining tabs for the ribbon -
alternatively if you do not want to punch you could close the top with a
bulldog clip.
Step 8:
I added some more decoration to the sloped top of box:
Wow, Mary this is fabulous. Thank you for such a brilliant project and such detailed instructions too.
I do hope you will give this a go and then share your makes in the group. Can't wait to see them.
Okay, that's it for today.
See you back here on Friday.
TTFN
XX


What a gorgeous box
ReplyDeleteGood luck to Lisa with her new launch today. It’s an absolute beautiful set.
ReplyDeleteMary this is one fabulous make. I love this project and should have a try at making one although I haven’t got these tulips I shall use either the other tulips die set or something else. Thank you for such detailed instructions.
Have a great day everyone
Lots of love
Connie 💜
Fab project - thank you Mary! Hope everyone got what they wanted from Lisa's gorgeous ODS! Su Robson
ReplyDelete