Showing posts with label Liz marsden. Show all posts

Monday, 17 February 2020

A small tutorial on how I created a folded over Album for Lisa Horton Crafts

Hi guys, you may have seen this album on the recent 3rd February show on Create and Craft, so I thought I'd show you how I created it.


This folding album was created with some of the left over pieces which came in the MDF bookcase with grey board albums kit.


 I still have some left too, but that's for another day!!! lol

...................................................................
Tutorial


These are the pieces I had left over after making my albums which I showed you on another post the other day, so for this album I made you will need


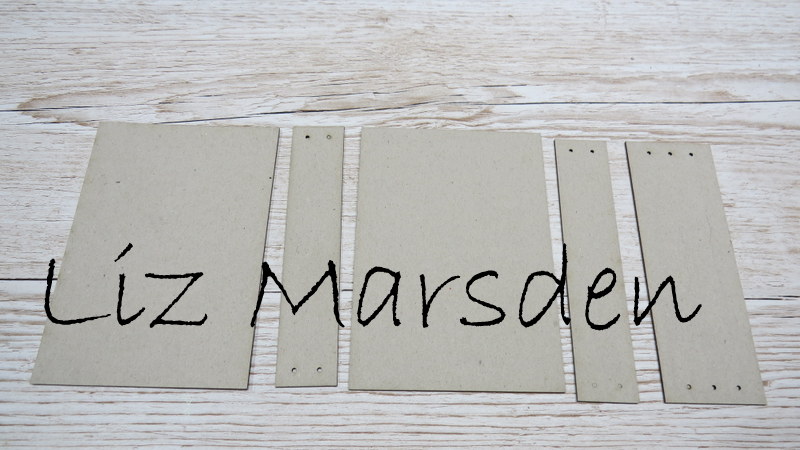
2 album cover fronts
2 narrow spines
1 wider spine,
arrange them in the order shown above,


I covered the outsides of mine with some canvas, but you can use papers, brown paper etc,
Glue the pieces as shown leaving some extra around the edges of the grey board  so you have enough to go over the edges and it will stick down well.  I only had a piece this big but you can make the extra around the edges larger, the gaps between the spines and covers was about 5mm or half a Centimetre, I  used a wet glue to adhere the pieces,

trim the corners as shown above and add some good quality tape as well as some of liquid glue, this just helps it to stick to the grey board well,


Turn the extra fabric over the edges of the greyboard, pressing it down firmly, when set you can lightly burnish along the gaps between the spine with your nail or bone folder for it to fold up,


This is how it folds.  The wider spine goes over the front cover of the album. I finished this off by using some  distress inks and a couple of the stencils which were on the show,
I closed mine by adding some small magnets, but you can use string, or elastic or lace etc,

 For the inside I used the Spring Themed stencil with some distress ink through, onto some plain white card,


After first cutting the card stock down to size, I had already glued mine in place but you can stencil first then glue them in place,


This hides the outer cover, you can of course use designer paper too,

I made some pockets for mine which I simply used the stencil again, of course you can fill yours with anything,


Here I finished it off with some of the fabulous wordage papers, which I simply cut down with my trimmer and glued them on where I wanted them,


Mine was based on holding stamped images, one for uncoloured and one for some finished coloured images, as above is a peek of some gorgeous stamps coming soon!!! 

........................................................................................

I do hope you have a go at 
making your own albums, show us your makes with Lisa's products on our Facebook page,
Facebook page,
We love to see what you create,

If you missed any of the products on the show you can buy them from Lisa's shop or online 14 days from the show date,


Happy Crafting!!
Hugs Liz xx

Tuesday, 21 January 2020

The Road To ........

Hi guys!!  Liz here,
 I'm so excited to be sharing my first post with you as a design team member of 
Lisa Horton Crafts!!

Lisa has some outstanding products coming up soon and some have already been seen, I can tell you they are all fabulous to work with,

I've created a few projects for this month but the one I wanted to highlight today is this MDF Tag with lots of Lisa's products some of which were on the show on Create and Craft Yesterday,


The base of the tag has some of the papers Lisa sent me in my DT kit, which are from the Capri paper set, these papers take inks and other medium perfectly,
Taking the In The Loop DL stamp set I used the largest  stamp from the set and using an embossing stamp pad I stamped part of the stamp on the left hand side along the length of the tag, then I used some embossing powder over the top and heat set it in place,


Next using one of the stencils coming soon I used some stencil paste on the right hand side of the tag, (this gives a little texture), leave to dry,

Meanwhile I stamped the largest of the Butterflies from the Butterfly Flourish DL stamp set onto some white card with a black ink pad and coloured it in with distress inks, then I fussy cut it out with my scissors, 

When the stencil paste is dry you can start adding some more stamped images on the top part of the tag, here I  again used the stamps from the In The Loop stamp set, as you can see stamping over some parts of the embossed stamping, that is entirely up to you were you place your stamps and how you place them, there are no right or wrongs!! just have fun!!!


For the bottom of the tag, I first stamped one of the fabulous stamps from the Be happy Sentiments DL stamp set onto white card stock, again using a black ink pad, then I used similar distress ink colours to the Capri paper on the base of the tag to tie it all in, this I cut slightly smaller then the width of the tag leaving the same sort of width above and below the sentiment, I then distressed the card stock edges with a distress tool or you could use scissors,

I felt there was a gap on the left of the sentiment so I stamped one of the smaller Butterflies from the Butterfly flourish stamp set, I glued this section onto the bottom section of the tag,  

To finish my tag off I added a little of the distress ink colours here and there on top of the Capri papers, again to tie it all in, after gluing my Butterfly in place, I added a little light bulb embellishment that I secured onto my Butterfly from my stash, but they look fabulous with out anything extra added too, Lastly I added some twine through the hole at the top of the tag,


I hope you will have a go yourself, we love to see your creations using Lisa's products and if you wish to show us there is a Face Book site you can join,


Watch out for more fantastic inspiration from the other talented Design Team members both on our blog and the Face Book Site mentioned above, Youtube , Pinterest, and Instagram

Happy Crafting!!!
Hugs Liz xx

Thursday, 9 January 2020

All about Liz Marsden

- MEET THE TEAM - 

Liz Marsden


Hi my name is Liz and I am married to a fabulous man who indulges my craft passion, we have two grown up kids and One Granddaughter, who I see nearly every day as I do the school runs and occasionally have her in the school Holidays,
I have been crafting one way or another most of my life, I spent many hours colouring when I was younger then when I got older I loved to do sewing and  even making my own clothes.  Knitting was next when I had my children, as well as  tapestry, Embroidery and Decoupage etc.   A little later I discovered Card making and finally my love of mixed Media!

  I am extremely lucky to have a craft room and this is where I love to be in my free time. 
I love to have variety in my work, so I make Foamiran flowers and love to create projects in the Shabby Chic style. 
I have been on numerous Design Teams over the years and feel excited and honoured to be part of Lisa's fabulous team. 
Happy Crafting!!