Hi all
Hope your week is going well?
If you read the blog on Monday you will know that I was not a very happy bunny because my plans for a double screen for my computer were not going well.
I know I berate my hubby when he is drilling etc whilst I am doing a live on Facebook but I do have to say he doesn't like to be beaten.
So when things are not going well, he takes himself off, goes to You Tube and watches as many videos as is necessary for him to fathom out what he needs to do to get things working as required.
So, an extra piece of equipment and several You Tube videos later, he had another go and Woohoo Dawn is now a very happy bunny. I now have two screens working in harmony and can do the jobs I need to do with a lot more ease.
So thank you to my husband, he's not a bad egg really. Lol.
***
If you missed my live on Monday here is the link for the edited version on our You Tube channel.
I just love how well Lisa's glitter card takes ink! It is so satisfying and well worth giving it a go.
***
Of course, it is Wednesday and you all know by now that means a new project for you to try.
This week's project is from the lovely Natalia.
Pop up box with flowers for a special
birthday.
·
Layering stencils & dies Build a flower
·
Layering stencils & dies Essential
foliage
·
3D embossing folder Natural woodgrain
·
Bold phrases dies
·
Large stitched numbers
·
Glitter card
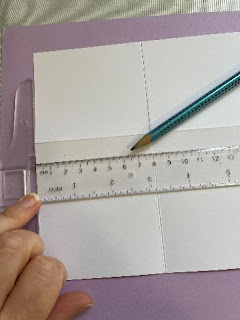
Cut card measuring 16cm by 24cm and score at 8cm and 16cm,
turn the card and score at 7cm. Cut the folded lines to 7cm fold line.
Cut card measuring 10cm by 16cm, score on 10cm side at 1cm
and 9cm. Turn and mark 7cm on both sides of the card, cut away on scored line
up to 7cm mark at an angle.
Cut three strips measuring
2.5cm by 10cm and score on long side at 1cm and 9cm.
On the large scored card inside
of card mark three dots with pencil on the left side. This is where the strips
will go. Fold the scored lines on the strips Z shape, as shown below, and add strong tape to the
edges.
Adhere the strips one cm from
the fold starting with gluing the strips on one side first. Be sure the strips
are parallel with the fold. Fold the card and adhere the strips on the other side
of box. Fold again to be sure you can fold the box flat both ways.


So you should have a partly build box as
shown in the image below.
Add the red tape to the card at the edges (card
measuring 10cm by 16cm) This will be the back of the box.
Adhere the card to the box on
one of the sides and secure.
Fold the box and secure the
other side of the card to the box, so that it goes flat.
So you will have a box like
this.
Emboss white card using
Natural woodgrain embossing folder. Cut out for the box and adhere to the sides
and for inside. Cut enough to cover each flap and each side of the box - 8 pieces in all.
Cut the number 60 and sentiments
in glitter card and white card. Stencil and die cut the florals.
Cut thin strips of the
acetate ( I used some from old packaging ) Add the red tape to the back of
numbers which cut out of glitter card. Adhere the acetate to the back and cover
with the number cut out from white card. Do the same for the other number.
This pop up box card fits 7x7
inches envelope. When adding the florals to the box be sure it doesn’t go higher than the box itself.


Here is the finished pop up box card.


Thank you so much Natalia.
What a gorgeous box card. Who wouldn't love to receive something like this on a birthday or anniversary. It's like a card and a present all rolled into one isn't it?
Remember, if you decide to give this a go, please share your make in the group as we do love to see them.
Right, that's your lot for today.
See you back here on Friday.
TTFN
xx


Aww I’m so pleased your hubby got the second screen working for you Dawn how lovely is that? 😁I can just picture you now 😁😁😁😁
ReplyDeleteSuch an informative live you did there Dawn and like many other things I shall try it out when I have a craft day 😉
Natalia the box card is fantastic and as soon as I get my new embossing folders I shall be trying this one. Thank you for inspiring us 😘
Lots of love
Connie 💜
Thanks Connie. At least I will look like I know what I'm doing eh? I look forward to seeing the finished projects. Dx
DeleteSo pleased you got your monitors sorted. I use 2 at work. It’s so much easier. Hubbies can come in quite useful at times lol. Love all the lives especially the latest one using glitter card and pigment inks. Definitely giving that a go. Been quite busy so not seen a live, live so to speak, lately. Fingers crossed I will soon. Been itching to have a go at a pop up box card so I’m chuffed that we’ve now got instructions how to make one. Another definite one to try. Thanks again for all your time and inspiration Dawn. Very much appreciated. Karen Keen x
ReplyDeleteHe has his uses Karen that's for sure. Lol I look forward to seeing your finished makes in the group. Dx
Delete