Good Wednesday afternoon to you.
I trust that you are all staying safe and hydrated in this hot weather?
So, as I promised you yesterday Wednesday's mean a project post.
Each week on a Wednesday, one of our fabulous Design Team members will create a step by step project for you.
It may be a full project, it may be a tip on how to achieve a simple effect or just how to use certain products in the easiest way. Either way it will be a lovely mix of ideas and projects for you to try.
By all means, if there is something that you have always wanted to have a go at and would like someone to do a project based around that idea, then do let us know by leaving a comment on any of the blog posts. They are checked every day so it won't get missed.
You won't find these projects anywhere else, they are purely and simply for those of you who follow and read the blog.
********
So the first project Wednesday has been provided by the lovely Natalia Smith.
Celebrate the season
card.
3D embossed bow and
inky background.

·
Distress oxide inks
·
3D embossing folder bow
·
Sand block
·
Euphoria watercolours
·
Box kit magazine 4 stamps
·
LHC silver steel embossing powder
Cut white card the same size as embossing folder, blend inks with Salvaged patina halfway and the other half of card with Broken china.

I have added splatter to the card with silver colour paint with little brush. Let it to dry and emboss.


Using the sand block , sand down lightly the embossed bow. Wipe away with micro cloth.


Cut the embossed bow into rectangle
measuring 11.5 cm by 16 cm. Matt and layer with slightly bigger white card to
have little border.
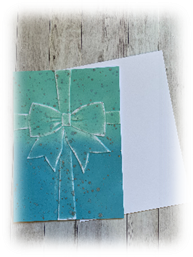
Create the base card measuring 14 cm by 19 cm. Blend the inks around the edges by using Broken chine at the top and Salvaged patina at the bottom.

Stamp the sentiment with Versa
Mark ink at the bottom on right side of embossed bow and heat emboss with
silver embossing powder. Adhere the embossed bow image to the front of the card
with 3D foam pads.

What a gorgeous project.
Obviously you can choose whatever colours you like or you can use the same colours that Natalia has used. The choice is yours.
Don't forget to share into the Crafting with Lisa Horton Group if you have a go at this project because we would love to see your take on it.
A great project. One for me to try out when I get my folders thank you 🙂
ReplyDeleteLovely, will give the background a go. Xx
ReplyDeleteGreat project 🤗 now I have the folder will be giving it a try, thanks Natalia xx
ReplyDeleteFabulous project for us all to try. I may just have a go 😜 My goodies are arriving later today and can’t wait to open them. I’m quite excited about this box kit 4 there’s so much inspiration to follow. Thank you everyone on the design team.
ReplyDeleteLots of love
Connie 💜
Thank you for this tip. I love this card. I have a new sanding block not used so may be the time to have a go at this.
ReplyDeleteWhat a beautiful card. Just love it x
ReplyDelete